Maintenance and Care
Maintenance and Care
Maintenance and Care

Create successful ePaper yourself
Turn your PDF publications into a flip-book with our unique Google optimized e-Paper software.
<strong>Maintenance</strong> <strong>and</strong> <strong>Care</strong><br />
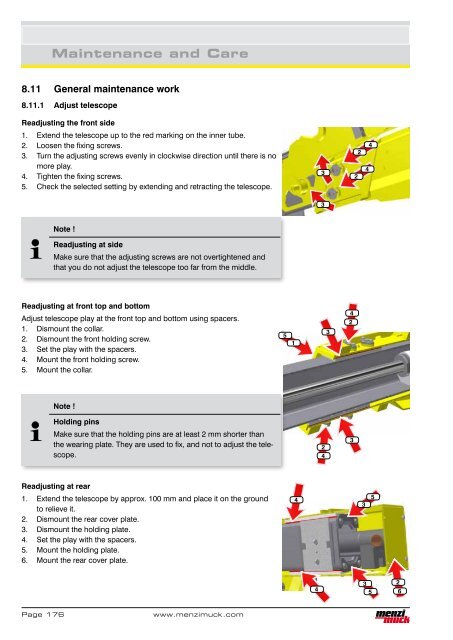
8.11 General maintenance work<br />
8.11.1 Adjust telescope<br />
Readjusting the front side<br />
1. Extend the telescope up to the red marking on the inner tube.<br />
2. Loosen the fixing screws.<br />
3. Turn the adjusting screws evenly in clockwise direction until there is no<br />
more play.<br />
4. Tighten the fixing screws.<br />
5. Check the selected setting by extending <strong>and</strong> retracting the telescope.<br />
Note !<br />
Readjusting at side<br />
Make sure that the adjusting screws are not overtightened <strong>and</strong><br />
that you do not adjust the telescope too far from the middle.<br />
Readjusting at front top <strong>and</strong> bottom<br />
Adjust telescope play at the front top <strong>and</strong> bottom using spacers.<br />
1. Dismount the collar.<br />
2. Dismount the front holding screw.<br />
3. Set the play with the spacers.<br />
4. Mount the front holding screw.<br />
5. Mount the collar.<br />
Note !<br />
Holding pins<br />
Make sure that the holding pins are at least 2 mm shorter than<br />
the wearing plate. They are used to fix, <strong>and</strong> not to adjust the telescope.<br />
Readjusting at rear<br />
1. Extend the telescope by approx. 100 mm <strong>and</strong> place it on the ground<br />
to relieve it.<br />
2. Dismount the rear cover plate.<br />
3. Dismount the holding plate.<br />
4. Set the play with the spacers.<br />
5. Mount the holding plate.<br />
6. Mount the rear cover plate.<br />
Page 176 www.menzimuck.com<br />
5<br />
1<br />
4<br />
4<br />
3<br />
3<br />
2<br />
4<br />
3<br />
4<br />
2<br />
3<br />
2<br />
2<br />
3<br />
4<br />
4<br />
5<br />
3<br />
5<br />
2<br />
6