Lesson 20 Anchor Bolt Plan Frame Cross Section ... - VP Buildings
Lesson 20 Anchor Bolt Plan Frame Cross Section ... - VP Buildings
Lesson 20 Anchor Bolt Plan Frame Cross Section ... - VP Buildings

You also want an ePaper? Increase the reach of your titles
YUMPU automatically turns print PDFs into web optimized ePapers that Google loves.
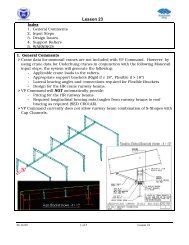
<strong>Lesson</strong> <strong>20</strong><br />
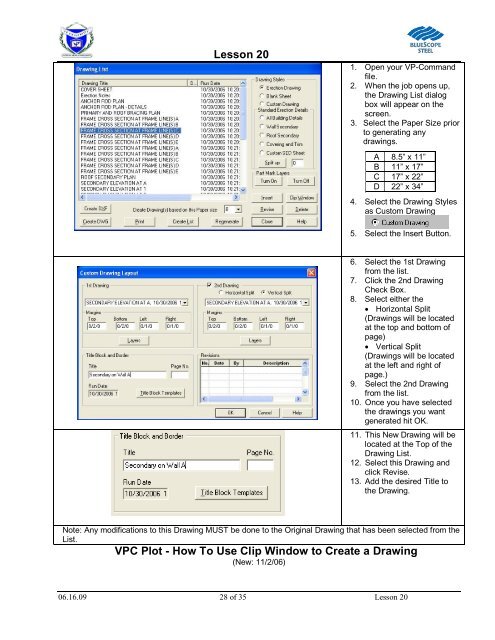
1. Open your <strong>VP</strong>-Command<br />
file.<br />
2. When the job opens up,<br />
the Drawing List dialog<br />
box will appear on the<br />
screen.<br />
3. Select the Paper Size prior<br />
to generating any<br />
drawings.<br />
A 8.5” x 11”<br />
B 11” x 17”<br />
C 17” x 22”<br />
D 22” x 34”<br />
4. Select the Drawing Styles<br />
as Custom Drawing<br />
5. Select the Insert Button.<br />
6. Select the 1st Drawing<br />
from the list.<br />
7. Click the 2nd Drawing<br />
Check Box.<br />
8. Select either the<br />
Horizontal Split<br />
(Drawings will be located<br />
at the top and bottom of<br />
page)<br />
Vertical Split<br />
(Drawings will be located<br />
at the left and right of<br />
page.)<br />
9. Select the 2nd Drawing<br />
from the list.<br />
10. Once you have selected<br />
the drawings you want<br />
generated hit OK.<br />
11. This New Drawing will be<br />
located at the Top of the<br />
Drawing List.<br />
12. Select this Drawing and<br />
click Revise.<br />
13. Add the desired Title to<br />
the Drawing.<br />
Note: Any modifications to this Drawing MUST be done to the Original Drawing that has been selected from the<br />
List.<br />
<strong>VP</strong>C Plot - How To Use Clip Window to Create a Drawing<br />
(New: 11/2/06)<br />
06.16.09 28 of 35 <strong>Lesson</strong> <strong>20</strong>