You also want an ePaper? Increase the reach of your titles
YUMPU automatically turns print PDFs into web optimized ePapers that Google loves.
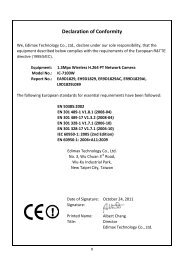
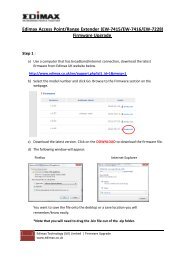
6.6.2 How To Change The Snapshot And Recording Directory?<br />
�You can change the snapshot and video directory. Click on “Setting” button in the <strong>Camera</strong> Viewer’s<br />
Control Panel and then click on “General” tab.<br />
Snap Shot Directory<br />
Record Directory<br />
Free Disk Space<br />
Max Recording Space<br />
General<br />
Click on Change button to change the directory. This snapshot directory will<br />
store the bitmap files. The default folder is where the software program is<br />
installed, “C:\Program Files\<strong>Internet</strong> <strong>Camera</strong>”.<br />
Click on Change button to change the directory. This record directory will store<br />
the recorded video file (AVI). The default folder is where the software program<br />
is installed, “C:\Program Files\<strong>Internet</strong> <strong>Camera</strong>”.<br />
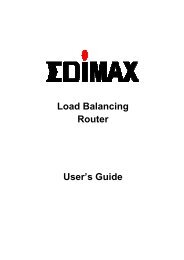
The current free disk space of the hard drive where is assigned to save<br />
recording files.<br />
You can reserve a disk space to store the recorded video and snapshot files. If<br />
the space is full, a message will pop up to remind you.<br />
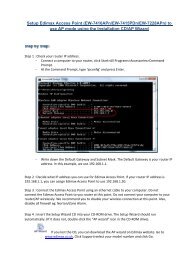
Used Disk Space The current used disk space for saving the recording file.<br />
Max Video File Size<br />
This let you to assign a maximum size of each video file. The upper bound of<br />
this value is 2 GB per file.<br />
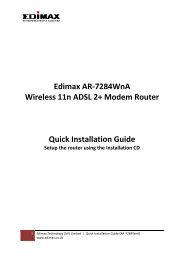
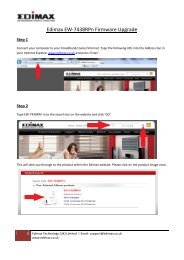
6.6.3 Schedule Recording<br />
Schedule Recording<br />
You can assign a schedule and let this <strong>Camera</strong> Viewer automatically record the video stream. The file<br />
name of the recorded video file is followed the date and time of the recording. For example, the file name<br />
is “IP<strong>Camera</strong>_2007-10-01-23-00-00.avi”. This means that the video was recorded on 2007/10/01 at<br />
23:00:00.<br />
Note:<br />
A. Before you set up the Schedule Recording, the <strong>Camera</strong> Viewer must be up and running and ensure it is<br />
successfully connected to the <strong>Internet</strong> <strong>Camera</strong>, otherwise the Schedule Recording will fail.<br />
B. The One-Time or Weekly Schedule should not overlap; otherwise the Schedule Recording will fail.<br />
�Click on “Setting” button in the <strong>Camera</strong> Viewer’s Control Panel and then click on “Recording” tab.<br />
15