MC Series Gas-Fired Circulating Heater - Heat Transfer Products, Inc
MC Series Gas-Fired Circulating Heater - Heat Transfer Products, Inc
MC Series Gas-Fired Circulating Heater - Heat Transfer Products, Inc

Create successful ePaper yourself
Turn your PDF publications into a flip-book with our unique Google optimized e-Paper software.
13<br />
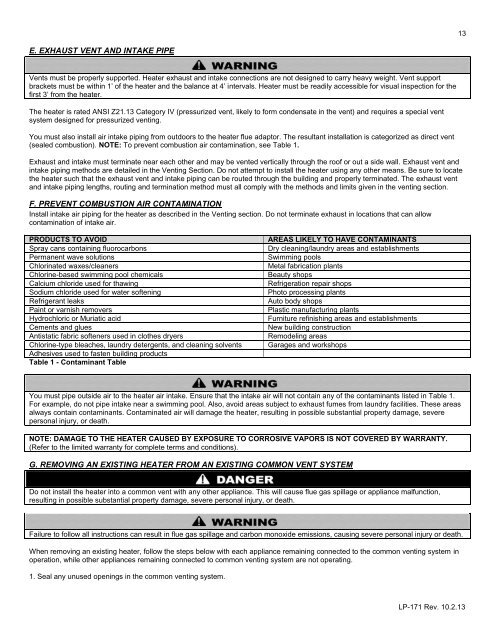
E. EXHAUST VENT AND INTAKE PIPE<br />
Vents must be properly supported. <strong><strong>Heat</strong>er</strong> exhaust and intake connections are not designed to carry heavy weight. Vent support<br />
brackets must be within 1’ of the heater and the balance at 4’ intervals. <strong><strong>Heat</strong>er</strong> must be readily accessible for visual inspection for the<br />
first 3’ from the heater.<br />
The heater is rated ANSI Z21.13 Category IV (pressurized vent, likely to form condensate in the vent) and requires a special vent<br />
system designed for pressurized venting.<br />
You must also install air intake piping from outdoors to the heater flue adaptor. The resultant installation is categorized as direct vent<br />
(sealed combustion). NOTE: To prevent combustion air contamination, see Table 1.<br />
Exhaust and intake must terminate near each other and may be vented vertically through the roof or out a side wall. Exhaust vent and<br />
intake piping methods are detailed in the Venting Section. Do not attempt to install the heater using any other means. Be sure to locate<br />
the heater such that the exhaust vent and intake piping can be routed through the building and properly terminated. The exhaust vent<br />
and intake piping lengths, routing and termination method must all comply with the methods and limits given in the venting section.<br />
F. PREVENT COMBUSTION AIR CONTAMINATION<br />
Install intake air piping for the heater as described in the Venting section. Do not terminate exhaust in locations that can allow<br />
contamination of intake air.<br />
PRODUCTS TO AVOID<br />
Spray cans containing fluorocarbons<br />
Permanent wave solutions<br />
Chlorinated waxes/cleaners<br />
Chlorine-based swimming pool chemicals<br />
Calcium chloride used for thawing<br />
Sodium chloride used for water softening<br />
Refrigerant leaks<br />
Paint or varnish removers<br />
Hydrochloric or Muriatic acid<br />
Cements and glues<br />
Antistatic fabric softeners used in clothes dryers<br />
Chlorine-type bleaches, laundry detergents, and cleaning solvents<br />
Adhesives used to fasten building products<br />
Table 1 - Contaminant Table<br />
AREAS LIKELY TO HAVE CONTAMINANTS<br />
Dry cleaning/laundry areas and establishments<br />
Swimming pools<br />
Metal fabrication plants<br />
Beauty shops<br />
Refrigeration repair shops<br />
Photo processing plants<br />
Auto body shops<br />
Plastic manufacturing plants<br />
Furniture refinishing areas and establishments<br />
New building construction<br />
Remodeling areas<br />
Garages and workshops<br />
You must pipe outside air to the heater air intake. Ensure that the intake air will not contain any of the contaminants listed in Table 1.<br />
For example, do not pipe intake near a swimming pool. Also, avoid areas subject to exhaust fumes from laundry facilities. These areas<br />
always contain contaminants. Contaminated air will damage the heater, resulting in possible substantial property damage, severe<br />
personal injury, or death.<br />
NOTE: DAMAGE TO THE HEATER CAUSED BY EXPOSURE TO CORROSIVE VAPORS IS NOT COVERED BY WARRANTY.<br />
(Refer to the limited warranty for complete terms and conditions).<br />
G. REMOVING AN EXISTING HEATER FROM AN EXISTING COMMON VENT SYSTEM<br />
Do not install the heater into a common vent with any other appliance. This will cause flue gas spillage or appliance malfunction,<br />
resulting in possible substantial property damage, severe personal injury, or death.<br />
Failure to follow all instructions can result in flue gas spillage and carbon monoxide emissions, causing severe personal injury or death.<br />
When removing an existing heater, follow the steps below with each appliance remaining connected to the common venting system in<br />
operation, while other appliances remaining connected to common venting system are not operating.<br />
1. Seal any unused openings in the common venting system.<br />
LP-171 Rev. 10.2.13