MC Series Gas-Fired Circulating Heater - Heat Transfer Products, Inc
MC Series Gas-Fired Circulating Heater - Heat Transfer Products, Inc
MC Series Gas-Fired Circulating Heater - Heat Transfer Products, Inc

Create successful ePaper yourself
Turn your PDF publications into a flip-book with our unique Google optimized e-Paper software.
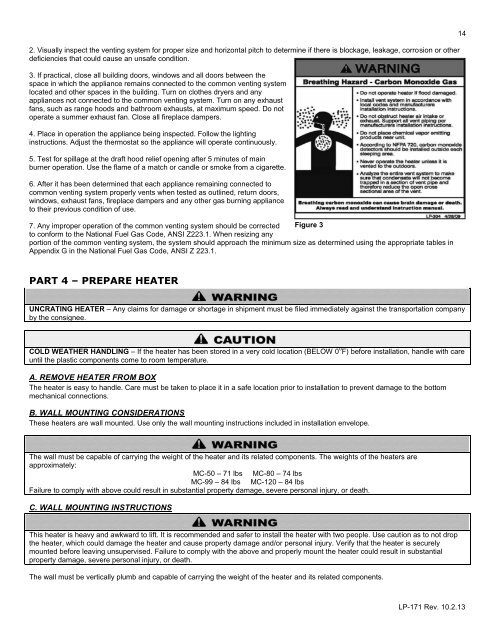
2. Visually inspect the venting system for proper size and horizontal pitch to determine if there is blockage, leakage, corrosion or other<br />
deficiencies that could cause an unsafe condition.<br />
3. If practical, close all building doors, windows and all doors between the<br />
space in which the appliance remains connected to the common venting system<br />
located and other spaces in the building. Turn on clothes dryers and any<br />
appliances not connected to the common venting system. Turn on any exhaust<br />
fans, such as range hoods and bathroom exhausts, at maximum speed. Do not<br />
operate a summer exhaust fan. Close all fireplace dampers.<br />
4. Place in operation the appliance being inspected. Follow the lighting<br />
instructions. Adjust the thermostat so the appliance will operate continuously.<br />
5. Test for spillage at the draft hood relief opening after 5 minutes of main<br />
burner operation. Use the flame of a match or candle or smoke from a cigarette.<br />
6. After it has been determined that each appliance remaining connected to<br />
common venting system properly vents when tested as outlined, return doors,<br />
windows, exhaust fans, fireplace dampers and any other gas burning appliance<br />
to their previous condition of use.<br />
7. Any improper operation of the common venting system should be corrected Figure 3<br />
to conform to the National Fuel <strong>Gas</strong> Code, ANSI Z223.1. When resizing any<br />
portion of the common venting system, the system should approach the minimum size as determined using the appropriate tables in<br />
Appendix G in the National Fuel <strong>Gas</strong> Code, ANSI Z 223.1.<br />
14<br />
PART 4 – PREPARE HEATER<br />
UNCRATING HEATER – Any claims for damage or shortage in shipment must be filed immediately against the transportation company<br />
by the consignee.<br />
COLD WEATHER HANDLING – If the heater has been stored in a very cold location (BELOW 0 o F) before installation, handle with care<br />
until the plastic components come to room temperature.<br />
A. REMOVE HEATER FROM BOX<br />
The heater is easy to handle. Care must be taken to place it in a safe location prior to installation to prevent damage to the bottom<br />
mechanical connections.<br />
B. WALL MOUNTING CONSIDERATIONS<br />
These heaters are wall mounted. Use only the wall mounting instructions included in installation envelope.<br />
The wall must be capable of carrying the weight of the heater and its related components. The weights of the heaters are<br />
approximately:<br />
<strong>MC</strong>-50 – 71 lbs <strong>MC</strong>-80 – 74 lbs<br />
<strong>MC</strong>-99 – 84 lbs <strong>MC</strong>-120 – 84 lbs<br />
Failure to comply with above could result in substantial property damage, severe personal injury, or death.<br />
C. WALL MOUNTING INSTRUCTIONS<br />
This heater is heavy and awkward to lift. It is recommended and safer to install the heater with two people. Use caution as to not drop<br />
the heater, which could damage the heater and cause property damage and/or personal injury. Verify that the heater is securely<br />
mounted before leaving unsupervised. Failure to comply with the above and properly mount the heater could result in substantial<br />
property damage, severe personal injury, or death.<br />
The wall must be vertically plumb and capable of carrying the weight of the heater and its related components.<br />
LP-171 Rev. 10.2.13