

DOC023.53.80040 sc200 Controller - Hachflow
DOC023.53.80040 sc200 Controller - Hachflow
DOC023.53.80040 sc200 Controller - Hachflow

You also want an ePaper? Increase the reach of your titles
YUMPU automatically turns print PDFs into web optimized ePapers that Google loves.
3. From the Relay Setup menu, choose Select Source and push<br />
ENTER. Normally, a source is one of the sensors attached to the<br />
system, but the controller can also function as a source. If an analog<br />
input module is installed, the source may be the analog input.<br />
4. From the Relay Setup menu, select Set Parameter and choose from<br />
the list of parameters. The list of parameter options will vary with the<br />
type of attached sensor.<br />
5. From the Relay Setup menu, select Set Function and choose from<br />
the list. Further setup will depend on the function chosen.<br />
Option<br />
Scheduler Function<br />
(available if the<br />
controller is selected as<br />
the relay source)<br />
Alarm Function<br />
Feeder Control Function<br />
Description<br />
Relay switches at certain times independently<br />
of any process value<br />
Relay activates when upper or lower alarm<br />
value is exceeded<br />
Relay indicates if a process value exceeds or<br />
falls below a setpoint<br />
• Scheduler Function (refer to Figure 17)<br />
Option<br />
Hold outputs<br />
Run days<br />
Start time<br />
Interval<br />
Duration<br />
Off delay<br />
Description<br />
Holds outputs in the present ON or OFF state<br />
Sets the weekday(s) that the relay operates. Options:<br />
Sunday, Monday, Tuesday., Wednesday, Thursday, Friday,<br />
Saturday<br />
Sets the start time.<br />
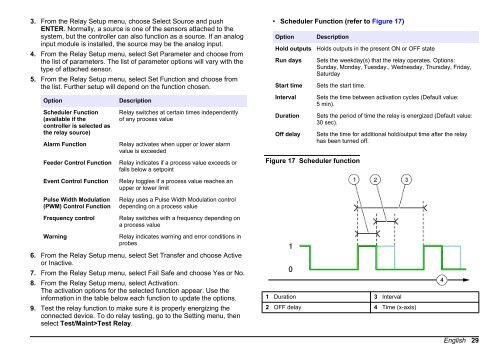
Figure 17 Scheduler function<br />
Sets the time between activation cycles (Default value:<br />
5 min).<br />
Sets the period of time the relay is energized (Default value:<br />
30 sec).<br />
Sets the time for additional hold/output time after the relay<br />
has been turned off.<br />
Event Control Function<br />
Pulse Width Modulation<br />
(PWM) Control Function<br />
Frequency control<br />
Warning<br />
Relay toggles if a process value reaches an<br />
upper or lower limit<br />
Relay uses a Pulse Width Modulation control<br />
depending on a process value<br />
Relay switches with a frequency depending on<br />
a process value<br />
Relay indicates warning and error conditions in<br />
probes<br />
6. From the Relay Setup menu, select Set Transfer and choose Active<br />
or Inactive.<br />
7. From the Relay Setup menu, select Fail Safe and choose Yes or No.<br />
8. From the Relay Setup menu, select Activation.<br />
The activation options for the selected function appear. Use the<br />
information in the table below each function to update the options.<br />
9. Test the relay function to make sure it is properly energizing the<br />
connected device. To do relay testing, go to the Setting menu, then<br />
select Test/Maint>Test Relay.<br />
1 Duration 3 Interval<br />
2 OFF delay 4 Time (x-axis)<br />
English 29


