Using the AmaSeis seismogram viewer and downloading - QuarkNet
Using the AmaSeis seismogram viewer and downloading - QuarkNet
Using the AmaSeis seismogram viewer and downloading - QuarkNet

Create successful ePaper yourself
Turn your PDF publications into a flip-book with our unique Google optimized e-Paper software.
<strong>Using</strong> <strong>AmaSeis</strong>… Page 44 of 69<br />
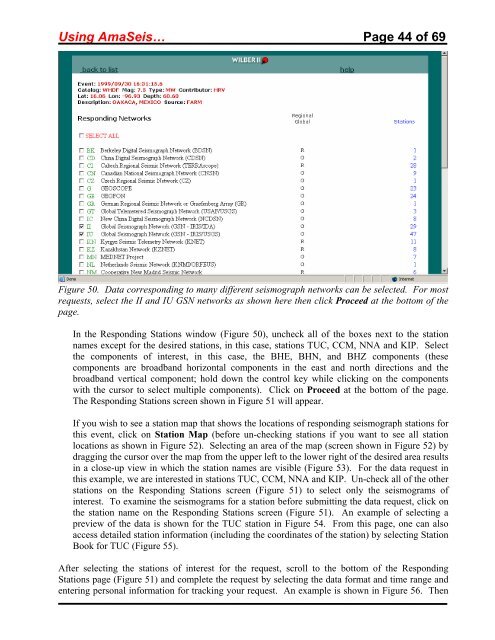
Figure 50. Data corresponding to many different seismograph networks can be selected. For most<br />
requests, select <strong>the</strong> II <strong>and</strong> IU GSN networks as shown here <strong>the</strong>n click Proceed at <strong>the</strong> bottom of <strong>the</strong><br />
page.<br />
In <strong>the</strong> Responding Stations window (Figure 50), uncheck all of <strong>the</strong> boxes next to <strong>the</strong> station<br />
names except for <strong>the</strong> desired stations, in this case, stations TUC, CCM, NNA <strong>and</strong> KIP. Select<br />
<strong>the</strong> components of interest, in this case, <strong>the</strong> BHE, BHN, <strong>and</strong> BHZ components (<strong>the</strong>se<br />
components are broadb<strong>and</strong> horizontal components in <strong>the</strong> east <strong>and</strong> north directions <strong>and</strong> <strong>the</strong><br />
broadb<strong>and</strong> vertical component; hold down <strong>the</strong> control key while clicking on <strong>the</strong> components<br />
with <strong>the</strong> cursor to select multiple components). Click on Proceed at <strong>the</strong> bottom of <strong>the</strong> page.<br />
The Responding Stations screen shown in Figure 51 will appear.<br />
If you wish to see a station map that shows <strong>the</strong> locations of responding seismograph stations for<br />
this event, click on Station Map (before un-checking stations if you want to see all station<br />
locations as shown in Figure 52). Selecting an area of <strong>the</strong> map (screen shown in Figure 52) by<br />
dragging <strong>the</strong> cursor over <strong>the</strong> map from <strong>the</strong> upper left to <strong>the</strong> lower right of <strong>the</strong> desired area results<br />
in a close-up view in which <strong>the</strong> station names are visible (Figure 53). For <strong>the</strong> data request in<br />
this example, we are interested in stations TUC, CCM, NNA <strong>and</strong> KIP. Un-check all of <strong>the</strong> o<strong>the</strong>r<br />
stations on <strong>the</strong> Responding Stations screen (Figure 51) to select only <strong>the</strong> <strong>seismogram</strong>s of<br />
interest. To examine <strong>the</strong> <strong>seismogram</strong>s for a station before submitting <strong>the</strong> data request, click on<br />
<strong>the</strong> station name on <strong>the</strong> Responding Stations screen (Figure 51). An example of selecting a<br />
preview of <strong>the</strong> data is shown for <strong>the</strong> TUC station in Figure 54. From this page, one can also<br />
access detailed station information (including <strong>the</strong> coordinates of <strong>the</strong> station) by selecting Station<br />
Book for TUC (Figure 55).<br />
After selecting <strong>the</strong> stations of interest for <strong>the</strong> request, scroll to <strong>the</strong> bottom of <strong>the</strong> Responding<br />
Stations page (Figure 51) <strong>and</strong> complete <strong>the</strong> request by selecting <strong>the</strong> data format <strong>and</strong> time range <strong>and</strong><br />
entering personal information for tracking your request. An example is shown in Figure 56. Then