ORiNOCO® Access Points Installation and Management Guide ...
ORiNOCO® Access Points Installation and Management Guide ...
ORiNOCO® Access Points Installation and Management Guide ...
- No tags were found...

You also want an ePaper? Increase the reach of your titles
YUMPU automatically turns print PDFs into web optimized ePapers that Google loves.
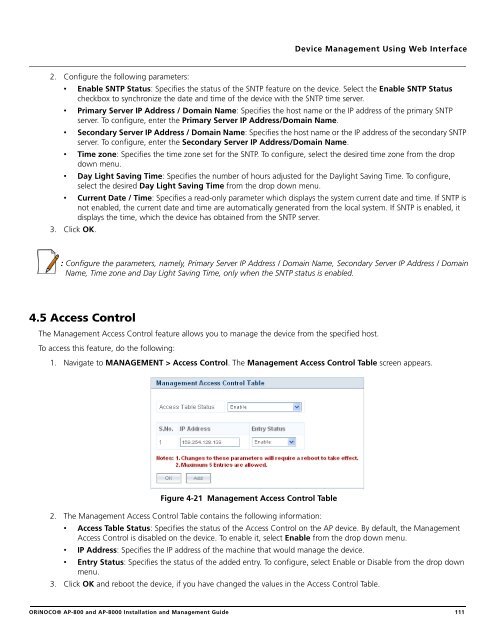
Device <strong>Management</strong> Using Web Interface2. Configure the following parameters:• Enable SNTP Status: Specifies the status of the SNTP feature on the device. Select the Enable SNTP Statuscheckbox to synchronize the date <strong>and</strong> time of the device with the SNTP time server.• Primary Server IP Address / Domain Name: Specifies the host name or the IP address of the primary SNTPserver. To configure, enter the Primary Server IP Address/Domain Name.• Secondary Server IP Address / Domain Name: Specifies the host name or the IP address of the secondary SNTPserver. To configure, enter the Secondary Server IP Address/Domain Name.• Time zone: Specifies the time zone set for the SNTP. To configure, select the desired time zone from the dropdown menu.• Day Light Saving Time: Specifies the number of hours adjusted for the Daylight Saving Time. To configure,select the desired Day Light Saving Time from the drop down menu.• Current Date / Time: Specifies a read-only parameter which displays the system current date <strong>and</strong> time. If SNTP isnot enabled, the current date <strong>and</strong> time are automatically generated from the local system. If SNTP is enabled, itdisplays the time, which the device has obtained from the SNTP server.3. Click OK.: Configure the parameters, namely, Primary Server IP Address / Domain Name, Secondary Server IP Address / DomainName, Time zone <strong>and</strong> Day Light Saving Time, only when the SNTP status is enabled.4.5 <strong>Access</strong> ControlThe <strong>Management</strong> <strong>Access</strong> Control feature allows you to manage the device from the specified host.To access this feature, do the following:1. Navigate to MANAGEMENT > <strong>Access</strong> Control. The <strong>Management</strong> <strong>Access</strong> Control Table screen appears.Figure 4-21 <strong>Management</strong> <strong>Access</strong> Control Table2. The <strong>Management</strong> <strong>Access</strong> Control Table contains the following information:• <strong>Access</strong> Table Status: Specifies the status of the <strong>Access</strong> Control on the AP device. By default, the <strong>Management</strong><strong>Access</strong> Control is disabled on the device. To enable it, select Enable from the drop down menu.• IP Address: Specifies the IP address of the machine that would manage the device.• Entry Status: Specifies the status of the added entry. To configure, select Enable or Disable from the drop downmenu.3. Click OK <strong>and</strong> reboot the device, if you have changed the values in the <strong>Access</strong> Control Table.<strong>ORiNOCO®</strong> AP-800 <strong>and</strong> AP-8000 <strong>Installation</strong> <strong>and</strong> <strong>Management</strong> <strong>Guide</strong> 111