1. Introduction to <strong>Galileo</strong>RBTSOS modeStopwatchSURF INTSwitch depthRemaining Bottom Time, it is the time that a diver can spend at the currentdepth before having to ascend in order to reach the surface with the settank reserve. The RBT accounts for all existing (if present) and upcomingdecompression obligations.The result of having completed a dive without respecting all mandatorydecompression obligations.A stopwatch, for example to time certain legs of the dive.Surface interval, the time from the moment the dive is closed.The depth at which the diver plans to switch to a higher oxygenconcentration mix while using the multi gas option in the ZH-L8 ADTMB PMG algorithm.T1, T2, TD Refers to tank T1, tank T2, tank TD when using the multi gas option of theZH-L8 ADT MB PMG algorithm.TATUTCWLTotal ascent time, the time it takes to perform the ascent from your currentdepth to the surface in a decompression dive, including all decompressionstops and assuming the ideal ascent rate.Universal Time Coordinated, refers to time zone changes when traveling.Workload.8
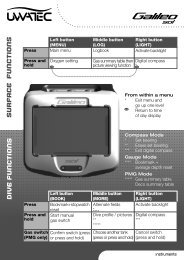
1. Introduction to <strong>Galileo</strong>1.2 Operating modesThe functions of the <strong>Galileo</strong> computercan be grouped into three categories,each corresponding to a specifi c mode ofoperation:- surface mode: the computer is on thesurface. In this mode you can changesettings, review your logbook, use thedive planner, see remaining desaturationafter a dive, download to PC and muchmore;- dive mode: the computer is at adepth of 0.8m/3ft or more. In thismode, <strong>Galileo</strong> monitors depth,time, temperature and performs alldecompression calculations;- sleep mode: the computer is onthe surface after 3 minutes withoutoperation. Though the computerappears to be turned off completely, itis still active. <strong>Galileo</strong> checks the ambientpressure once every 60 secondsfor uninterrupted monitoring of theenvironment.heart rate (see section 2.9.5), the currenttemperature, the altitude class (in form of astylized mountain, see section 3.6) and thebattery capacity; on the lower row, the tankpressure, the set oxygen concentration, thecorresponding MOD and the active MB levelsetting (see section 2.3.1).English1.3 Turning on <strong>Galileo</strong> andtime of day displayTo start the computer, press and hold theright button. The screen will briefl y show the<strong>Galileo</strong> logo and then switch to the time ofday display. If you press the right button,you will skip the start-up picture and gostraight to the time of day display. Thinkof this as the home page of your new divecomputer. This is where it all starts.The type of information displayed in surfacemode is different depending on whether<strong>Galileo</strong> has remaining saturation from arecent dive or is completely desaturated.In case of no remaining saturation, thedisplay looks as depicted below. Thebuttons are marked, from left to right, withMENU, LOG and LIGHT. The top of thedisplay shows as default the <strong>Galileo</strong> logo,which can be replaced by the fi rst twolines of the owner information data (referto section 2.9.6 on owner information).The time of day is shown in the middle ofthe display. Underneath it, <strong>Galileo</strong> displaysvarious information: on the top row theIf the computer has remaining desaturationfrom a recent dive, the upper portion ofthe screen is replaced with the followinginformation: desaturation time, no-fl y time,surface interval and CNS O 2 (if applicable).The remaining desaturation time (DESAT)is calculated by the decompression modelin the computer. Any dive started whilethere is remaining desaturation on yourcomputer is considered a repetitive dive,meaning that <strong>Galileo</strong> accounts for the preexistingnitrogen load in your body.The no-fly time (NO FLY) is the time duringwhich an exposure to the reduced pressure9
- Page 1: English
- Page 4 and 5: • Only make dives that are approp
- Page 6 and 7: 2.4 Digital compass ...............
- Page 8 and 9: 1. Introduction to Galileo1. INTROD
- Page 12 and 13: 1. Introduction to Galileoinside th
- Page 14 and 15: 1. Introduction to Galileo WARNINGS
- Page 16 and 17: 1. Introduction to Galileohas to be
- Page 18 and 19: 1. Introduction to Galileostrap aro
- Page 20 and 21: 2. Menus, settings and functions2.1
- Page 22 and 23: 2. Menus, settings and functions2.3
- Page 24 and 25: 2. Menus, settings and functionsset
- Page 26 and 27: 2. Menus, settings and functionsTo
- Page 28 and 29: 2. Menus, settings and functionsDur
- Page 30 and 31: 2. Menus, settings and functionscol
- Page 32 and 33: 2. Menus, settings and functions WA
- Page 34 and 35: 2. Menus, settings and functions2.6
- Page 36 and 37: 2. Menus, settings and functionsyou
- Page 38 and 39: 2. Menus, settings and functions NO
- Page 40 and 41: 2. Menus, settings and functionsWit
- Page 42 and 43: 2. Menus, settings and functionsIf
- Page 44 and 45: 3. Diving with GalileoThe fi fth pa
- Page 46 and 47: 3. Diving with GalileoAlong these l
- Page 48 and 49: 3. Diving with Galileoabove the pre
- Page 50 and 51: 3. Diving with GalileoIn a LOW BATT
- Page 52 and 53: 3. Diving with Galileo WARNING- If
- Page 54 and 55: 3. Diving with Galileosupport divin
- Page 56 and 57: 3. Diving with Galileoset bearings
- Page 58 and 59: 3. Diving with Galileo NOTE :The ba
- Page 60 and 61:
3. Diving with Galileo3.5.2 Display
- Page 62 and 63:
3. Diving with Galileo2000m/6600ft
- Page 64 and 65:
3. Diving with GalileoWhile TANK is
- Page 66 and 67:
3. Diving with Galileo NOTE:- Start
- Page 68 and 69:
3. Diving with Galileo- If you are
- Page 70 and 71:
3. Diving with Galileo3.9 Button fu
- Page 72 and 73:
4. Galileo and SmartTRAK (PC interf
- Page 74 and 75:
4. Galileo and SmartTRAK (PC interf
- Page 76 and 77:
5. Taking care of Galileo5. TAKING
- Page 78 and 79:
5. Taking care of Galileo NOTE:- Af
- Page 80:
5. Taking care of Galileo5.4 IndexA