CITY 1.24 and 2.24 GN CITY 1.24 and 2.24 B/P
CITY 1.24 and 2.24 GN CITY 1.24 and 2.24 B/P
CITY 1.24 and 2.24 GN CITY 1.24 and 2.24 B/P

Create successful ePaper yourself
Turn your PDF publications into a flip-book with our unique Google optimized e-Paper software.
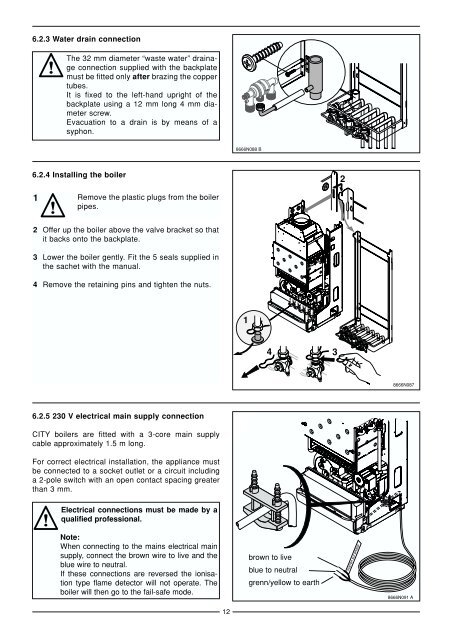
6.2.3 Water drain connection<br />
6.2.4 Installing the boiler<br />
1<br />
The 32 mm diameter “waste water” drainage<br />
connection supplied with the backplate<br />
must be fitted only after brazing the copper<br />
tubes.<br />
It is P19 fixed to the left-h<strong>and</strong> upright of the<br />
backplate using a 12 mm long 4 mm diameter<br />
screw.<br />
Evacuation to a drain is by means of a<br />
syphon.<br />
Remove the plastic plugs from the boiler<br />
pipes.<br />
2 Offer up the boiler above the valve bracket so that<br />
it backs onto the backplate.<br />
3 Lower the boiler gently. Fit the 5 seals supplied in<br />
the sachet with the manual.<br />
4 Remove the retaining pins <strong>and</strong> tighten the nuts.<br />
6.2.5 230 V electrical main supply connection<br />
<strong>CITY</strong> boilers are fitted with a 3-core main supply<br />
cable approximately 1.5 m long.<br />
For correct electrical installation, the appliance must<br />
be connected to a socket outlet or a circuit including<br />
a 2-pole switch with an open contact spacing greater<br />
than 3 mm.<br />
Electrical connections must be made by a<br />
qualified professional.<br />
Note:<br />
When connecting to the mains electrical main<br />
supply, connect the brown wire to live <strong>and</strong> the<br />
blue wire to neutral.<br />
If these connections are reversed the ionisation<br />
type flame detector will not operate. The<br />
boiler will then go to the fail-safe mode.<br />
12<br />
8666N088 B<br />
1<br />
4<br />
brown to live<br />
blue to neutral<br />
grenn/yellow to earth<br />
3<br />
2<br />
marron sur phase<br />
8666N087<br />
8666N091 A