Manual - Unvented Gas Log Heater or Vented Decorative Appliance
Manual - Unvented Gas Log Heater or Vented Decorative Appliance
Manual - Unvented Gas Log Heater or Vented Decorative Appliance

Create successful ePaper yourself
Turn your PDF publications into a flip-book with our unique Google optimized e-Paper software.
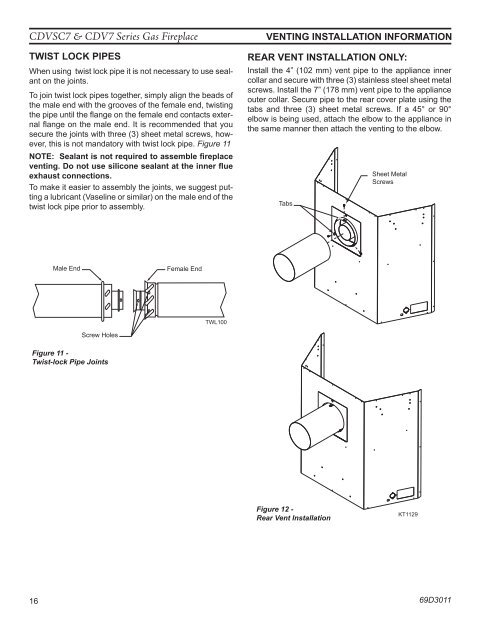
CDVSC7 & CDV7 Series <strong>Gas</strong> FireplaceTwist Lock PipesWhen using twist lock pipe it is not necessary to use sealanton the joints.To join twist lock pipes together, simply align the beads ofthe male end with the grooves of the female end, twistingthe pipe until the flange on the female end contacts externalflange on the male end. It is recommended that yousecure the joints with three (3) sheet metal screws, however,this is not mandat<strong>or</strong>y with twist lock pipe. Figure 11NOTE: Sealant is not required to assemble fireplaceventing. Do not use silicone sealant at the inner flueexhaust connections.To make it easier to assembly the joints, we suggest puttinga lubricant (Vaseline <strong>or</strong> similar) on the male end of thetwist lock pipe pri<strong>or</strong> to assembly.Venting INSTALLATION INFORMATIONREAR VENT INSTALLATION ONLY:Install the 4” (102 mm) vent pipe to the appliance innercollar and secure with three (3) stainless steel sheet metalscrews. Install the 7” (178 mm) vent pipe to the applianceouter collar. Secure pipe to the rear cover plate using thetabs and three (3) sheet metal screws. If a 45° <strong>or</strong> 90°elbow is being used, attach the elbow to the appliance inthe same manner then attach the venting to the elbow.TabsSheet MetalScrewsMale EndFemale EndTWL100Screw HolesFigure 11 -Twist-lock Pipe JointsTWL100Twist Lock Pipe3/12/99 djtFigure 12 -Rear Vent InstallationKT1129KT1129cdv add rear vent16 69D3011