Vashon (Avanti DVS FS) - Avalon
Vashon (Avanti DVS FS) - Avalon
Vashon (Avanti DVS FS) - Avalon

You also want an ePaper? Increase the reach of your titles
YUMPU automatically turns print PDFs into web optimized ePapers that Google loves.
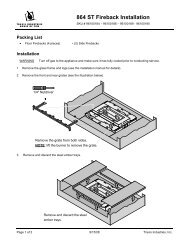
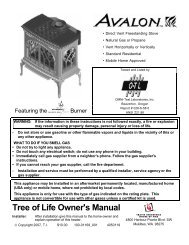
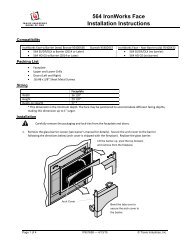
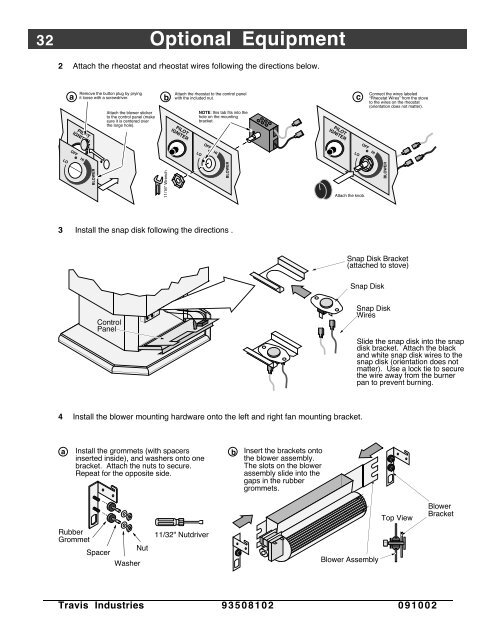
32 Optional Equipment2 Attach the rheostat and rheostat wires following the directions below.Remove Attach with the the included rheostat nut.to the control panela it loose with the a button screwdriver.plug by pryingb cPILOTIGNITERAttach the blower stickerto the control panel (makesure it is centered overthe large hole).PILOTIGNITERNOTE: this tab fits into thehole on the mountingbracket.PILOTIGNITERConnect the wires labeledÒRheostat WiresÓ from the stoveto the wires on the rheostat(orientation does not matter).OFFOFF HIOFFLOHILOLOHIBLOWER11/16" WrenchBLOWERAttach the knob.BLOWER3 Install the snap disk following the directions .Snap Disk Bracket(attached to stove)Snap DiskControlPanelSnap DiskWiresSlide the snap disk into the snapdisk bracket. Attach the blackand white snap disk wires to thesnap disk (orientation does notmatter). Use a lock tie to securethe wire away from the burnerpan to prevent burning.4 Install the blower mounting hardware onto the left and right fan mounting bracket.a Install the grommets (with spacersb Insert the brackets ontoinserted inside), and washers onto onethe blower assembly.bracket. Attach the nuts to secure.The slots on the blowerRepeat for the opposite side.assembly slide into thegaps in the rubbergrommets.Top ViewBlowerBracketRubberGrommetNutSpacerWasher11/32" NutdriverBlower AssemblyTravis Industries 93508102 091002