DLV1280-DX User Manual - Christie Digital Systems
DLV1280-DX User Manual - Christie Digital Systems
DLV1280-DX User Manual - Christie Digital Systems

Create successful ePaper yourself
Turn your PDF publications into a flip-book with our unique Google optimized e-Paper software.
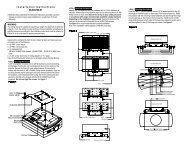
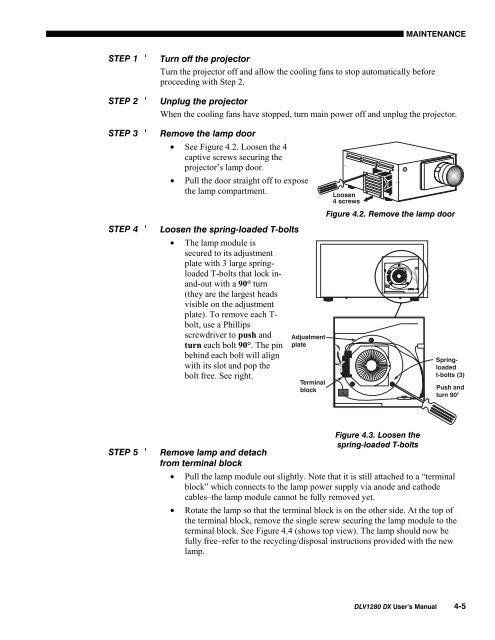
MAINTENANCESTEP 1 'STEP 2 'STEP 3 'Turn off the projectorTurn the projector off and allow the cooling fans to stop automatically beforeproceeding with Step 2.Unplug the projectorWhen the cooling fans have stopped, turn main power off and unplug the projector.Remove the lamp door• See Figure 4.2. Loosen the 4captive screws securing theprojector’s lamp door.• Pull the door straight off to exposethe lamp compartment.Figure 4.2. Remove the lamp doorSTEP 4 'Loosen the spring-loaded T-bolts• The lamp module issecured to its adjustmentplate with 3 large springloadedT-bolts that lock inand-outwith a 90° turn(they are the largest headsvisible on the adjustmentplate). To remove each T-bolt, use a Phillipsscrewdriver to push andturn each bolt 90°. The pinbehind each bolt will alignwith its slot and pop thebolt free. See right.STEP 5 'Remove lamp and detachfrom terminal blockFigure 4.3. Loosen thespring-loaded T-bolts• Pull the lamp module out slightly. Note that it is still attached to a “terminalblock” which connects to the lamp power supply via anode and cathodecables–the lamp module cannot be fully removed yet.• Rotate the lamp so that the terminal block is on the other side. At the top ofthe terminal block, remove the single screw securing the lamp module to theterminal block. See Figure 4.4 (shows top view). The lamp should now befully free–refer to the recycling/disposal instructions provided with the newlamp.<strong>DLV1280</strong> <strong>DX</strong> <strong>User</strong>’s <strong>Manual</strong> 4-5