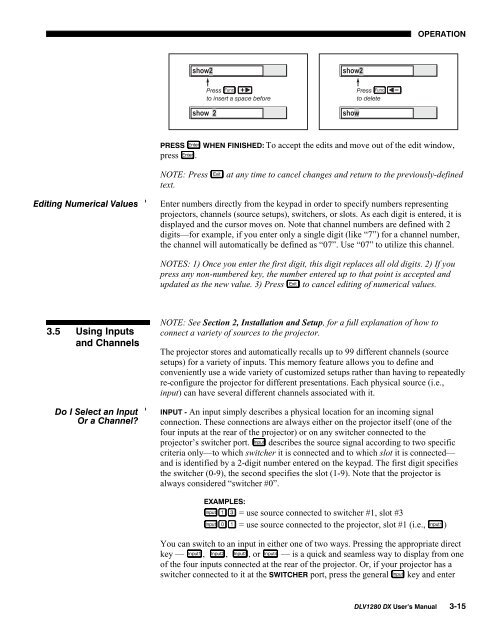
OPERATIONPRESS Enter WHEN FINISHED: To accept the edits and move out of the edit window,press Enter .NOTE: Press Exit at any time to cancel changes and return to the previously-definedtext.Editing Numerical Values 'Enter numbers directly from the keypad in order to specify numbers representingprojectors, channels (source setups), switchers, or slots. As each digit is entered, it isdisplayed and the cursor moves on. Note that channel numbers are defined with 2digits—for example, if you enter only a single digit (like “7”) for a channel number,the channel will automatically be defined as “07”. Use “07” to utilize this channel.NOTES: 1) Once you enter the first digit, this digit replaces all old digits. 2) If youpress any non-numbered key, the number entered up to that point is accepted andupdated as the new value. 3) Press Exit to cancel editing of numerical values.3.5 Using Inputsand ChannelsDo I Select an Input 'Or a Channel?NOTE: See Section 2, Installation and Setup, for a full explanation of how toconnect a variety of sources to the projector.The projector stores and automatically recalls up to 99 different channels (sourcesetups) for a variety of inputs. This memory feature allows you to define andconveniently use a wide variety of customized setups rather than having to repeatedlyre-configure the projector for different presentations. Each physical source (i.e.,input) can have several different channels associated with it.INPUT - An input simply describes a physical location for an incoming signalconnection. These connections are always either on the projector itself (one of thefour inputs at the rear of the projector) or on any switcher connected to theprojector’s switcher port. Input describes the source signal according to two specificcriteria only—to which switcher it is connected and to which slot it is connected—and is identified by a 2-digit number entered on the keypad. The first digit specifiesthe switcher (0-9), the second specifies the slot (1-9). Note that the projector isalways considered “switcher #0”.EXAMPLES:Input = use source connected to switcher #1, slot #3Input = use source connected to the projector, slot #1 (i.e., Input1 )You can switch to an input in either one of two ways. Pressing the appropriate directkey — Input1 , Input2 , Input3 , or Input4 — is a quick and seamless way to display from oneof the four inputs connected at the rear of the projector. Or, if your projector has aswitcher connected to it at the SWITCHER port, press the general Input key and enter<strong>DLV1280</strong> <strong>DX</strong> <strong>User</strong>’s <strong>Manual</strong> 3-15
OPERATIONthe 2-digit number representing the switcher and slot location for the desired signal(note there is no on-screen feedback for entering the numbers).Regardless of which method you use to select a source/input, the image will bedisplayed according to the following:If it is the first time you have used the source/input (or if you used the input but didnot define a channel by adjusting anything ), the projector will recognize the newinput signal based on its frequencies and polarities, and will automatically display animage according to default settings for such a signal. Note that a graphic source willresize into a full-screen image, whereas video or HDTV sources will resize only asmuch as possible while maintaining their aspect ratio.If you used the source once before and changed a display parameter such ascontrast, V-Position etc., then a channel was automatically created and still exists inprojector memory (see below). Using an Input key will automatically recall thischannel—and all its setup parameters—and update the display accordingly.If more than one channel exists for the input, the image will be displayed accordingto the setup parameters for the first channel with matching characteristics.CHANNEL - A channel is a collection of measurements, locations and settings thattailor a display to your specific needs. Since source types and applications can varygreatly, you will likely want to adjust and define a wide variety of parameters, suchas brightness, contrast, tint, size, etc., in order to customize and optimize the displaycoming from a particular source. For example, the display settings you choose for aVCR source may be very different from those you choose for a high resolutioncomputer source, or one signal may simply vary from another signal used earlierthrough the same input location. Once you have adjusted a display parameter, such aspixel tracking or contrast, all current settings are collectively stored in the projector'smemory as a unique 2-digit channel, such as . You can have numerous distinctchannels available for the same input, any of which can be selected by using the Chankey on the keypad followed by the 2-digitchannel number.NOTE: The Chan key may display a channellist or not, depending on what you havedefined within the Menu Preferences menu(see Menu Preferences later in this section).Shown at right is a sample channel listavailable from Chan .In order to use channels ( Chan on the keypad),you must first create them. See below.Creating a New 'Channel— AUTOMATIC —To use a new source with the projector, a new channel must be added to projectormemory so that the projector will respond properly to an input signal from thatsource in the future. A new channel can be created automatically, as described here,or it can be copied from an existing channel and then edited as necessary (seeCopying or Deleting Channels later in this section).When you select a direct input (press Input or Input1 , Input2 , Input3 or Input4 ), the existingchannels in the projector are searched for matching input and signal parameters. If nomatch to the incoming input signal is found in the currently defined channels, a new3-16 <strong>DLV1280</strong> <strong>DX</strong> <strong>User</strong>’s <strong>Manual</strong>