DLV1280-DX User Manual - Christie Digital Systems
DLV1280-DX User Manual - Christie Digital Systems
DLV1280-DX User Manual - Christie Digital Systems

Create successful ePaper yourself
Turn your PDF publications into a flip-book with our unique Google optimized e-Paper software.
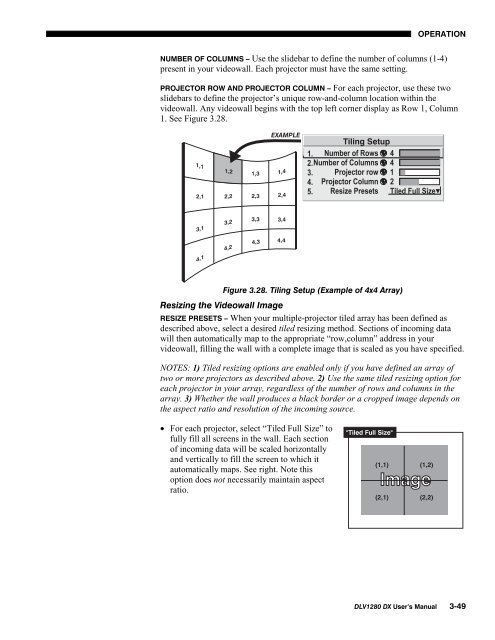
OPERATIONNUMBER OF COLUMNS – Use the slidebar to define the number of columns (1-4)present in your videowall. Each projector must have the same setting.PROJECTOR ROW AND PROJECTOR COLUMN – For each projector, use these twoslidebars to define the projector’s unique row-and-column location within thevideowall. Any videowall begins with the top left corner display as Row 1, Column1. See Figure 3.28.Figure 3.28. Tiling Setup (Example of 4x4 Array)Resizing the Videowall ImageRESIZE PRESETS – When your multiple-projector tiled array has been defined asdescribed above, select a desired tiled resizing method. Sections of incoming datawill then automatically map to the appropriate “row,column” address in yourvideowall, filling the wall with a complete image that is scaled as you have specified.NOTES: 1) Tiled resizing options are enabled only if you have defined an array oftwo or more projectors as described above. 2) Use the same tiled resizing option foreach projector in your array, regardless of the number of rows and columns in thearray. 3) Whether the wall produces a black border or a cropped image depends onthe aspect ratio and resolution of the incoming source.• For each projector, select “Tiled Full Size” tofully fill all screens in the wall. Each sectionof incoming data will be scaled horizontallyand vertically to fill the screen to which itautomatically maps. See right. Note thisoption does not necessarily maintain aspectratio.<strong>DLV1280</strong> <strong>DX</strong> <strong>User</strong>’s <strong>Manual</strong> 3-49