Getting Started with InfoSphere Data Architect

Create successful ePaper yourself
Turn your PDF publications into a flip-book with our unique Google optimized e-Paper software.
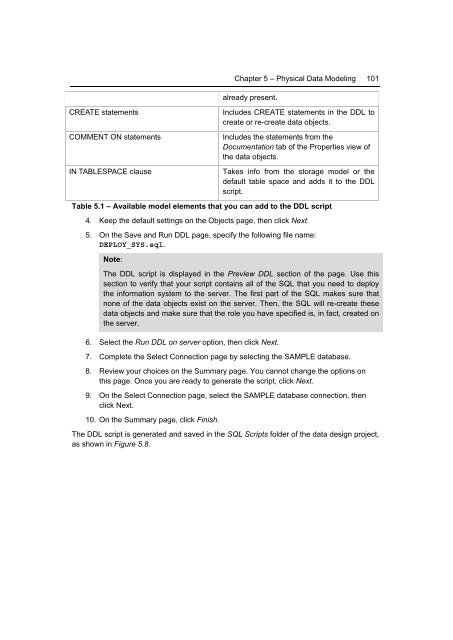
Chapter 5 – Physical <strong>Data</strong> Modeling 101<br />
already present.<br />
CREATE statements<br />
COMMENT ON statements<br />
IN TABLESPACE clause<br />
Includes CREATE statements in the DDL to<br />
create or re-create data objects.<br />
Includes the statements from the<br />
Documentation tab of the Properties view of<br />
the data objects.<br />
Takes info from the storage model or the<br />
default table space and adds it to the DDL<br />
script.<br />
Table 5.1 – Available model elements that you can add to the DDL script<br />
4. Keep the default settings on the Objects page, then click Next.<br />
5. On the Save and Run DDL page, specify the following file name:<br />
DEPLOY_SYS.sql.<br />
Note:<br />
The DDL script is displayed in the Preview DDL section of the page. Use this<br />
section to verify that your script contains all of the SQL that you need to deploy<br />
the information system to the server. The first part of the SQL makes sure that<br />
none of the data objects exist on the server. Then, the SQL will re-create these<br />
data objects and make sure that the role you have specified is, in fact, created on<br />
the server.<br />
6. Select the Run DDL on server option, then click Next.<br />
7. Complete the Select Connection page by selecting the SAMPLE database.<br />
8. Review your choices on the Summary page. You cannot change the options on<br />
this page. Once you are ready to generate the script, click Next.<br />
9. On the Select Connection page, select the SAMPLE database connection, then<br />
click Next.<br />
10. On the Summary page, click Finish.<br />
The DDL script is generated and saved in the SQL Scripts folder of the data design project,<br />
as shown in Figure 5.8.