Getting Started with InfoSphere Data Architect

You also want an ePaper? Increase the reach of your titles
YUMPU automatically turns print PDFs into web optimized ePapers that Google loves.
58 <strong>Getting</strong> started <strong>with</strong> <strong>InfoSphere</strong> <strong>Data</strong> <strong>Architect</strong><br />
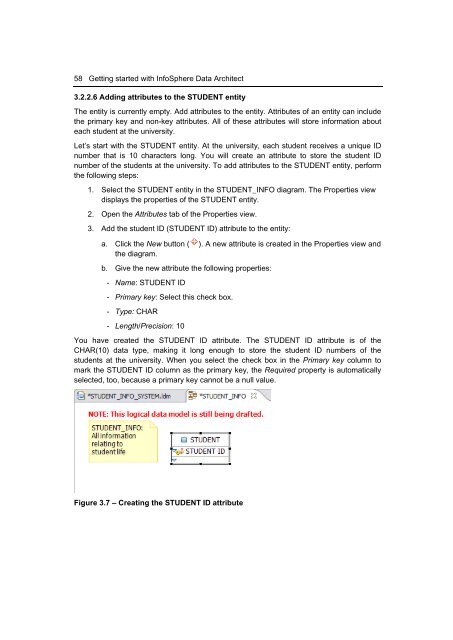
3.2.2.6 Adding attributes to the STUDENT entity<br />
The entity is currently empty. Add attributes to the entity. Attributes of an entity can include<br />
the primary key and non-key attributes. All of these attributes will store information about<br />
each student at the university.<br />
Let’s start <strong>with</strong> the STUDENT entity. At the university, each student receives a unique ID<br />
number that is 10 characters long. You will create an attribute to store the student ID<br />
number of the students at the university. To add attributes to the STUDENT entity, perform<br />
the following steps:<br />
1. Select the STUDENT entity in the STUDENT_INFO diagram. The Properties view<br />
displays the properties of the STUDENT entity.<br />
2. Open the Attributes tab of the Properties view.<br />
3. Add the student ID (STUDENT ID) attribute to the entity:<br />
a. Click the New button ( ). A new attribute is created in the Properties view and<br />
the diagram.<br />
b. Give the new attribute the following properties:<br />
- Name: STUDENT ID<br />
- Primary key: Select this check box.<br />
- Type: CHAR<br />
- Length/Precision: 10<br />
You have created the STUDENT ID attribute. The STUDENT ID attribute is of the<br />
CHAR(10) data type, making it long enough to store the student ID numbers of the<br />
students at the university. When you select the check box in the Primary key column to<br />
mark the STUDENT ID column as the primary key, the Required property is automatically<br />
selected, too, because a primary key cannot be a null value.<br />
Figure 3.7 – Creating the STUDENT ID attribute