Getting Started with InfoSphere Data Architect

Create successful ePaper yourself
Turn your PDF publications into a flip-book with our unique Google optimized e-Paper software.
Chapter 7 – Reverse-Engineering 139<br />
9. Right-click the STUDENT_PHONE column and select Analyze Left Impact. Since no other data<br />
objects reference this column, and since there are no other dependencies, there is no impact<br />
displayed in the Impacted Objects view.<br />
10. Use the Property Compare view to specify that you want to copy the STUDENT_PHONE column<br />
to the source schema.<br />
11. Locate the new STUDENT_LAST_NAME_IDX index, then analyze the impact and copy the<br />
change to the source schema.<br />
12. Generate the DDL to deploy your changes. The Generate Right DDL button generates the<br />
DDL that you need to deploy the changes to the database. The Generate DDL wizard opens.<br />
11. Complete the Save and Run DDL page:<br />
a. Make sure that the University Info System data design project is specified in the Folder field.<br />
b. In the File name field, specify DELTA_SDT_CHANGES.sql.<br />
c. Select the Run DDL on server check box to run the DDL script on the server and deploy your<br />
changes.<br />
d. Click Next.<br />
12. On the Select Connection page, select the SAMPLE database connection, then click Next.<br />
13. Review the information on the Summary page, then click Finish.<br />
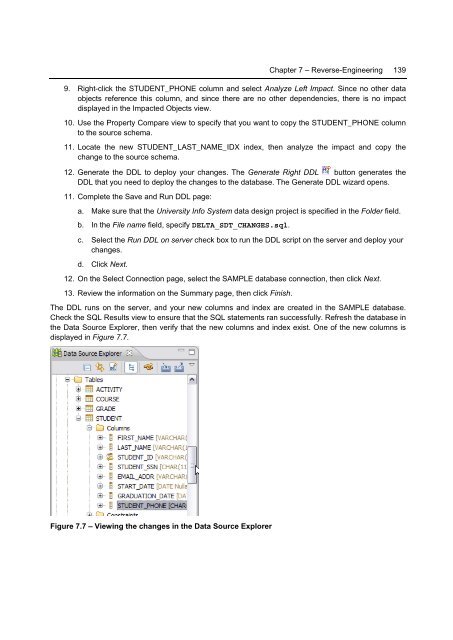
The DDL runs on the server, and your new columns and index are created in the SAMPLE database.<br />
Check the SQL Results view to ensure that the SQL statements ran successfully. Refresh the database in<br />
the <strong>Data</strong> Source Explorer, then verify that the new columns and index exist. One of the new columns is<br />
displayed in Figure 7.7.<br />
Figure 7.7 – Viewing the changes in the <strong>Data</strong> Source Explorer