display

Create successful ePaper yourself
Turn your PDF publications into a flip-book with our unique Google optimized e-Paper software.
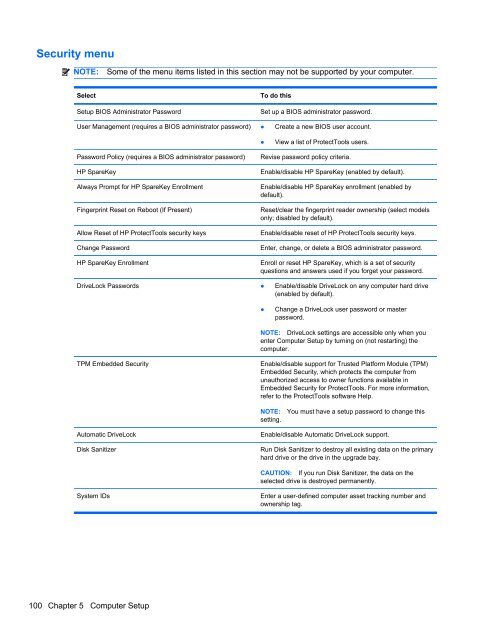
Security menu<br />
NOTE:<br />
Some of the menu items listed in this section may not be supported by your computer.<br />
Select<br />
To do this<br />
Setup BIOS Administrator Password<br />
Set up a BIOS administrator password.<br />
User Management (requires a BIOS administrator password) ● Create a new BIOS user account.<br />
●<br />
View a list of ProtectTools users.<br />
Password Policy (requires a BIOS administrator password)<br />
HP SpareKey<br />
Always Prompt for HP SpareKey Enrollment<br />
Fingerprint Reset on Reboot (If Present)<br />
Allow Reset of HP ProtectTools security keys<br />
Change Password<br />
HP SpareKey Enrollment<br />
Revise password policy criteria.<br />
Enable/disable HP SpareKey (enabled by default).<br />
Enable/disable HP SpareKey enrollment (enabled by<br />
default).<br />
Reset/clear the fingerprint reader ownership (select models<br />
only; disabled by default).<br />
Enable/disable reset of HP ProtectTools security keys.<br />
Enter, change, or delete a BIOS administrator password.<br />
Enroll or reset HP SpareKey, which is a set of security<br />
questions and answers used if you forget your password.<br />
DriveLock Passwords ● Enable/disable DriveLock on any computer hard drive<br />
(enabled by default).<br />
●<br />
Change a DriveLock user password or master<br />
password.<br />
NOTE: DriveLock settings are accessible only when you<br />
enter Computer Setup by turning on (not restarting) the<br />
computer.<br />
TPM Embedded Security<br />
Enable/disable support for Trusted Platform Module (TPM)<br />
Embedded Security, which protects the computer from<br />
unauthorized access to owner functions available in<br />
Embedded Security for ProtectTools. For more information,<br />
refer to the ProtectTools software Help.<br />
NOTE:<br />
setting.<br />
You must have a setup password to change this<br />
Automatic DriveLock<br />
Disk Sanitizer<br />
Enable/disable Automatic DriveLock support.<br />
Run Disk Sanitizer to destroy all existing data on the primary<br />
hard drive or the drive in the upgrade bay.<br />
CAUTION: If you run Disk Sanitizer, the data on the<br />
selected drive is destroyed permanently.<br />
System IDs<br />
Enter a user-defined computer asset tracking number and<br />
ownership tag.<br />
100 Chapter 5 Computer Setup