Embroidery Basics Articles

You also want an ePaper? Increase the reach of your titles
YUMPU automatically turns print PDFs into web optimized ePapers that Google loves.
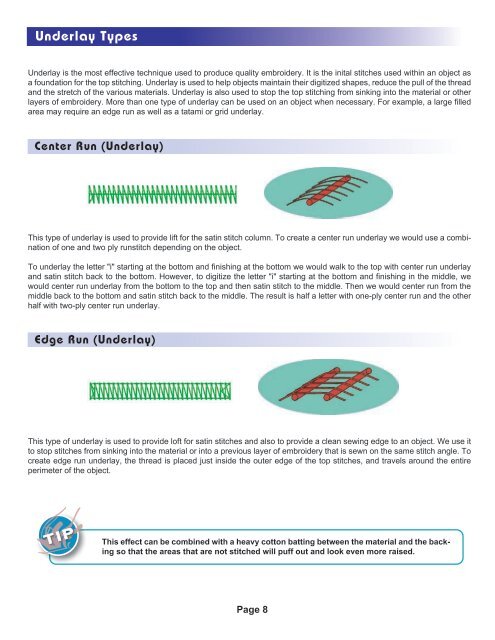
Underlay Types<br />
Underlay is the most effective technique used to produce quality embroidery. It is the inital stitches used within an object as<br />
a foundation for the top stitching. Underlay is used to help objects maintain their digitized shapes, reduce the pull of the thread<br />
and the stretch of the various materials. Underlay is also used to stop the top stitching from sinking into the material or other<br />
layers of embroidery. More than one type of underlay can be used on an object when necessary. For example, a large filled<br />
area may require an edge run as well as a tatami or grid underlay.<br />
Center Run (Underlay)<br />
This type of underlay is used to provide lift for the satin stitch column. To create a center run underlay we would use a combination<br />
of one and two ply runstitch depending on the object.<br />
To underlay the letter "i" starting at the bottom and finishing at the bottom we would walk to the top with center run underlay<br />
and satin stitch back to the bottom. However, to digitize the letter "i" starting at the bottom and finishing in the middle, we<br />
would center run underlay from the bottom to the top and then satin stitch to the middle. Then we would center run from the<br />
middle back to the bottom and satin stitch back to the middle. The result is half a letter with one-ply center run and the other<br />
half with two-ply center run underlay.<br />
Edge Run (Underlay)<br />
This type of underlay is used to provide loft for satin stitches and also to provide a clean sewing edge to an object. We use it<br />
to stop stitches from sinking into the material or into a previous layer of embroidery that is sewn on the same stitch angle. To<br />
create edge run underlay, the thread is placed just inside the outer edge of the top stitches, and travels around the entire<br />
perimeter of the object.<br />
TIP<br />
This effect can be combined with a heavy cotton batting between the material and the backing<br />
so that the areas that are not stitched will puff out and look even more raised.<br />
Page 8