Embroidery Basics Articles

You also want an ePaper? Increase the reach of your titles
YUMPU automatically turns print PDFs into web optimized ePapers that Google loves.
Tie In and Tie Off & Trims<br />
Tie ins and tie offs are some of the most important stitches in any design. The tie in stitches are the first few stitches at the<br />
beginning of an embroidery design. They are also necessary after any color change and after any thread trim or long jump.<br />
The tie in stitches ensure that the top thread and bobbin thread catch, or tie a knot before sewing begins. The tie in stitches<br />
are created by placing 3-5 stitches close together. These stitches are not part of the underlay and will be covered by top stitching,<br />
rendering them invisible. The tie off stitches are the last few stitches placed at the end of a design, and are mandatory to<br />
ensure that the threads do not unravel. They are also necessary at the end of a color and at the end of any object that will<br />
have a long jump or thread trim. A tie off is made in a similar fashion by placing 3-4 stitches very close together, creating a<br />
knot. The stitches should be placed inside the top stitching so that they are not visible. The stitch length for both tie ins and<br />
tie offs should be kept at 0.5 mm. Most digi systems have automatic tie ins and tie offs that can be preset for number of<br />
stitches and stitch lengths, and should be utilized at all times.<br />
Pathing<br />
Taking a moment to think through a design and choose a suitable path is essential to the digitizing process. The way that a<br />
design will be pathed determines both the efficiency and the aesthetics of the finished product. Machine time is reflected by<br />
the amount of trims, jumps and color changes in a design. This makes intelligent pathing extremely important in production.<br />
In deciding an effective path for a design, the digitizer must first learn to visualize the two dimensional artwork in its finished,<br />
three dimensional form. This process is important since some elements in the design may appear as if they are under other<br />
elements. Color sequence should be carefully thought out. Plan to use each color as few times as possible, to reduce the<br />
number of color stops in the design. Also consider the different elements of the design and how they affect the best path.<br />
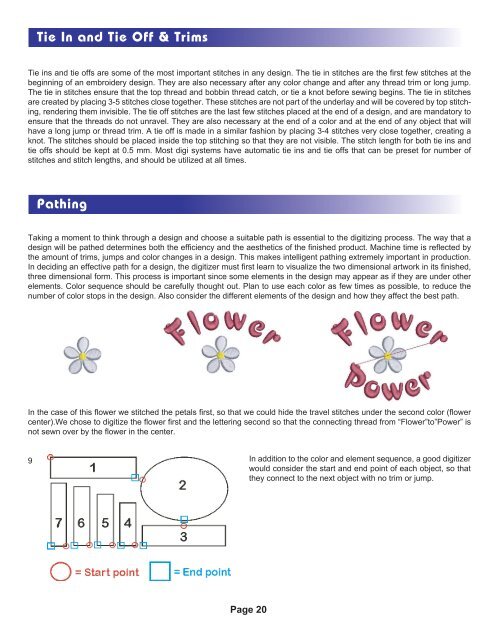
In the case of this flower we stitched the petals first, so that we could hide the travel stitches under the second color (flower<br />
center).We chose to digitize the flower first and the lettering second so that the connecting thread from “Flower”to”Power” is<br />
not sewn over by the flower in the center.<br />
9<br />
In addition to the color and element sequence, a good digitizer<br />
would consider the start and end point of each object, so that<br />
they connect to the next object with no trim or jump.<br />
Page 20