Embroidery Basics Articles
Create successful ePaper yourself
Turn your PDF publications into a flip-book with our unique Google optimized e-Paper software.
10/28/2016 Understanding Hoop Size & Sewing Field <strong>Embroidery</strong> Article<br />
have discovered our machine’ s sewing field limit while trying to stitch a design that exceeds the<br />
preset boundaries.My HusqvarnaViking Rose, an older model that runs from a program card with<br />
one small hoop and no image monitor , will try to stitch the design until it reaches the point where<br />
the design exceeds its sewing field limit of 3.93 x 3.93” – a frustrating waste of materials and<br />
time.On the other hand, some machines will simply refuse to stitch a design that is too large, and<br />
often won’t clearly reveal the reason, such as my Baby Lock Ellageo that doesn’t even recognize<br />
that the design is on the USB drive when the design size is more than its sewing field limit of 10.2<br />
x 6.2”. Learn your machine’s sewing field limit, and you will be able to determine whether a<br />
design will fit within the recommended “Hoop Size”.<br />
Determining Hoop Size<br />
First understand that the inch has been defined and internationally accepted as being equivalent<br />
to 25.4mm (millimeters) or 2.54cm (centimeters).If your ruler displays centimeters, just move the<br />
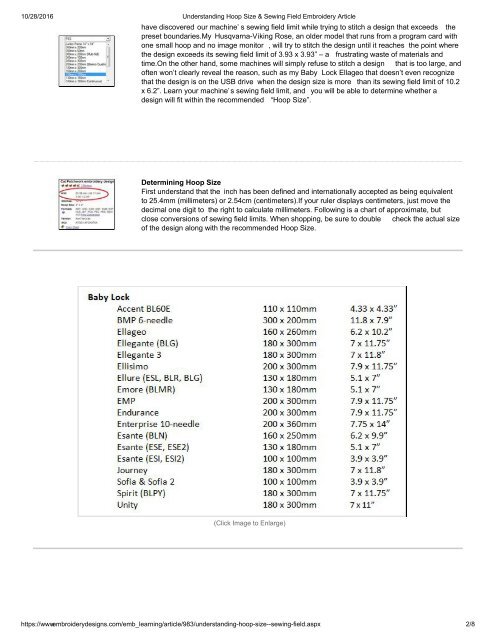
decimal one digit to the right to calculate millimeters. Following is a chart of approximate, but<br />
close conversions of sewing field limits. When shopping, be sure to double check the actual size<br />
of the design along with the recommended Hoop Size.<br />
(Click Image to Enlarge)<br />
https://www.embroiderydesigns.com/emb_learning/article/983/understandinghoopsizesewingfield.aspx 2/8


