Embroidery Basics Articles

Create successful ePaper yourself
Turn your PDF publications into a flip-book with our unique Google optimized e-Paper software.
10/28/2016 The Pros & Cons of Resizing Designs <strong>Embroidery</strong> Article<br />
you can add underlay to the rest of the sections.<br />
Those simple changes should make this uncomplicated design stitchable at double the<br />
size. It’s still not a jacket back size, though, so if we triple the size of the design, what then?<br />
The problems are the same, just in a bigger proportion.<br />
All of the columns become too wide at the tripled<br />
size. They can be changed to a fill, but now they<br />
need more underlay than did the columns on the<br />
original design. Again, with the click of a button, I<br />
added an edge walk for the primary underlay and<br />
an additional center walk for the secondary<br />
underlay.<br />
Since the problem was universal, I didn’t have to<br />
change the properties of each section, but could<br />
choose the entire design and change them only<br />
once.<br />
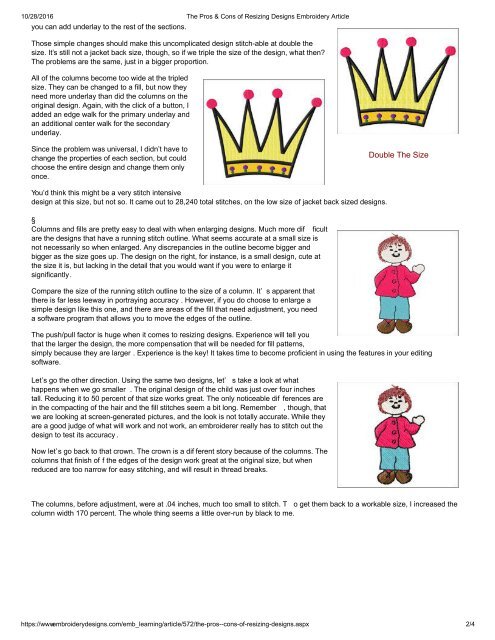
Double The Size<br />
You’d think this might be a very stitch intensive<br />
design at this size, but not so. It came out to 28,240 total stitches, on the low size of jacket back sized designs.<br />
§<br />
Columns and fills are pretty easy to deal with when enlarging designs. Much more dif ficult<br />
are the designs that have a running stitch outline. What seems accurate at a small size is<br />
not necessarily so when enlarged. Any discrepancies in the outline become bigger and<br />
bigger as the size goes up. The design on the right, for instance, is a small design, cute at<br />
the size it is, but lacking in the detail that you would want if you were to enlarge it<br />
significantly.<br />
Compare the size of the running stitch outline to the size of a column. It’ s apparent that<br />
there is far less leeway in portraying accuracy . However, if you do choose to enlarge a<br />
simple design like this one, and there are areas of the fill that need adjustment, you need<br />
a software program that allows you to move the edges of the outline.<br />
The push/pull factor is huge when it comes to resizing designs. Experience will tell you<br />
that the larger the design, the more compensation that will be needed for fill patterns,<br />
simply because they are larger . Experience is the key! It takes time to become proficient in using the features in your editing<br />
software.<br />
Let’s go the other direction. Using the same two designs, let’ s take a look at what<br />
happens when we go smaller . The original design of the child was just over four inches<br />
tall. Reducing it to 50 percent of that size works great. The only noticeable dif ferences are<br />
in the compacting of the hair and the fill stitches seem a bit long. Remember , though, that<br />
we are looking at screengenerated pictures, and the look is not totally accurate. While they<br />
are a good judge of what will work and not work, an embroiderer really has to stitch out the<br />
design to test its accuracy .<br />
Now let’s go back to that crown. The crown is a dif ferent story because of the columns. The<br />
columns that finish of f the edges of the design work great at the original size, but when<br />
reduced are too narrow for easy stitching, and will result in thread breaks.<br />
The columns, before adjustment, were at .04 inches, much too small to stitch. T o get them back to a workable size, I increased the<br />
column width 170 percent. The whole thing seems a little overrun by black to me.<br />
https://www.embroiderydesigns.com/emb_learning/article/572/theprosconsofresizingdesigns.aspx<br />
Let’s try changing the color and see what that<br />
2/4