Embroidery Basics Articles

Create successful ePaper yourself
Turn your PDF publications into a flip-book with our unique Google optimized e-Paper software.
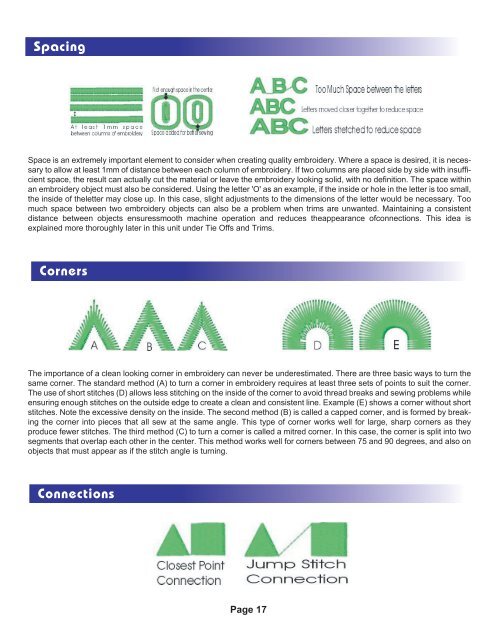
Spacing<br />
Space is an extremely important element to consider when creating quality embroidery. Where a space is desired, it is necessary<br />
to allow at least 1mm of distance between each column of embroidery. If two columns are placed side by side with insufficient<br />
space, the result can actually cut the material or leave the embroidery looking solid, with no definition. The space within<br />
an embroidery object must also be considered. Using the letter 'O' as an example, if the inside or hole in the letter is too small,<br />
the inside of theletter may close up. In this case, slight adjustments to the dimensions of the letter would be necessary. Too<br />
much space between two embroidery objects can also be a problem when trims are unwanted. Maintaining a consistent<br />
distance between objects ensuressmooth machine operation and reduces theappearance ofconnections. This idea is<br />
explained more thoroughly later in this unit under Tie Offs and Trims.<br />
Corners<br />
The importance of a clean looking corner in embroidery can never be underestimated. There are three basic ways to turn the<br />
same corner. The standard method (A) to turn a corner in embroidery requires at least three sets of points to suit the corner.<br />
The use of short stitches (D) allows less stitching on the inside of the corner to avoid thread breaks and sewing problems while<br />
ensuring enough stitches on the outside edge to create a clean and consistent line. Example (E) shows a corner without short<br />
stitches. Note the excessive density on the inside. The second method (B) is called a capped corner, and is formed by breaking<br />
the corner into pieces that all sew at the same angle. This type of corner works well for large, sharp corners as they<br />
produce fewer stitches. The third method (C) to turn a corner is called a mitred corner. In this case, the corner is split into two<br />
segments that overlap each other in the center. This method works well for corners between 75 and 90 degrees, and also on<br />
objects that must appear as if the stitch angle is turning.<br />
Connections<br />
Page 17