How to Grow More Vegetables : And Fruits, Nuts ... - Shroomery
How to Grow More Vegetables : And Fruits, Nuts ... - Shroomery
How to Grow More Vegetables : And Fruits, Nuts ... - Shroomery
You also want an ePaper? Increase the reach of your titles
YUMPU automatically turns print PDFs into web optimized ePapers that Google loves.
1.<br />
2.<br />
3.<br />
4.<br />
5.<br />
6.<br />
7.<br />
at a later point in time. We have found this soil preparation<br />
process greatly improves plant health and yields immediately in<br />
poor, compacted and heavy soil. It is often worth the extra<br />
digging time involved. <strong>How</strong>ever, it does use an insustainable<br />
amount of organic matter.<br />
The U-bar dig can be used as a substitute for the ongoing<br />
double-dig in soil that is in reasonably good shape. This usually<br />
means after one normal double-dig or more. The 18-inch-long<br />
U-bar tines (see page 13) do not prepare the soil as deeply as a<br />
spade and a spading fork used <strong>to</strong> double-dig 24 inches deep, but<br />
the lower 12 inches of the growing bed compact more slowly<br />
over time than the upper 12 inches. Also, the U-bar appears <strong>to</strong><br />
have the advantage of mixing up the soil strata much less than<br />
double-digging with a spade and a spading fork. It aerates the<br />
soil less, however. This is an advantage in looser, sandier soil<br />
and can be a problem in tighter clays. If you use a U-bar regularly,<br />
do a normal double-dig as often as increased compaction<br />
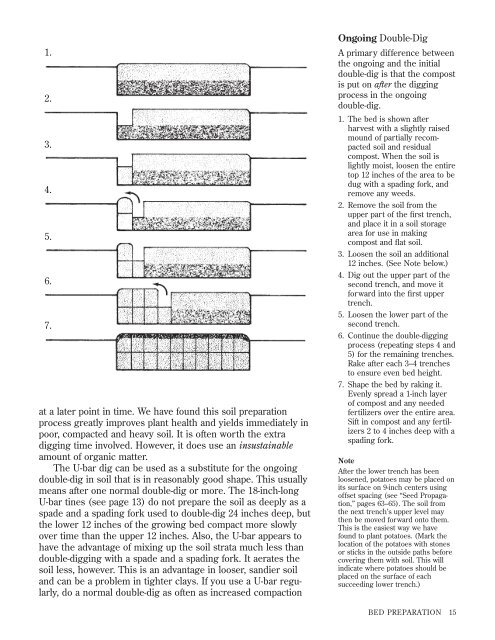
Ongoing Double-Dig<br />
A primary difference between<br />
the ongoing and the initial<br />
double-dig is that the compost<br />
is put on after the digging<br />
process in the ongoing<br />
double-dig.<br />
1. The bed is shown after<br />
harvest with a slightly raised<br />
mound of partially recompacted<br />
soil and residual<br />
compost. When the soil is<br />
lightly moist, loosen the entire<br />
<strong>to</strong>p 12 inches of the area <strong>to</strong> be<br />
dug with a spading fork, and<br />
remove any weeds.<br />
2. Remove the soil from the<br />
upper part of the first trench,<br />
and place it in a soil s<strong>to</strong>rage<br />
area for use in making<br />
compost and flat soil.<br />
3. Loosen the soil an additional<br />
12 inches. (See Note below.)<br />
4. Dig out the upper part of the<br />
second trench, and move it<br />
forward in<strong>to</strong> the first upper<br />
trench.<br />
5. Loosen the lower part of the<br />
second trench.<br />
6. Continue the double-digging<br />
process (repeating steps 4 and<br />
5) for the remaining trenches.<br />
Rake after each 3–4 trenches<br />
<strong>to</strong> ensure even bed height.<br />
7. Shape the bed by raking it.<br />
Evenly spread a 1-inch layer<br />
of compost and any needed<br />
fertilizers over the entire area.<br />
Sift in compost and any fertilizers<br />
2 <strong>to</strong> 4 inches deep with a<br />
spading fork.<br />
Note<br />
After the lower trench has been<br />
loosened, pota<strong>to</strong>es may be placed on<br />
its surface on 9-inch centers using<br />
offset spacing (see “Seed Propagation,”<br />
pages 63–65). The soil from<br />
the next trench’s upper level may<br />
then be moved forward on<strong>to</strong> them.<br />
This is the easiest way we have<br />
found <strong>to</strong> plant pota<strong>to</strong>es. (Mark the<br />
location of the pota<strong>to</strong>es with s<strong>to</strong>nes<br />
or sticks in the outside paths before<br />
covering them with soil. This will<br />
indicate where pota<strong>to</strong>es should be<br />
placed on the surface of each<br />
succeeding lower trench.)<br />
BED PREPARATION 15


