Guide to configuring eduroam using a Cisco wireless controller Best ...
Guide to configuring eduroam using a Cisco wireless controller Best ...
Guide to configuring eduroam using a Cisco wireless controller Best ...
Create successful ePaper yourself
Turn your PDF publications into a flip-book with our unique Google optimized e-Paper software.
Step 6: Remote Access Policies<br />
Remote Access Policies handle the local authentication and can for example grant different users access <strong>to</strong><br />
different networks: some <strong>to</strong> the guest network, some <strong>to</strong> VLAN 10, VLAN 12, etc.<br />
44<br />
• Right-click on “Remote Access Policies” and select “New Remote Access Policy”<br />
• Click on “Next”, select “Set up a cus<strong>to</strong>m policy” and type in a name for the policy<br />
• Choose descriptive names for policies, such as “Employees with guest network”, “Students in VLAN10”,<br />
etc.<br />
• Click on “Next”<br />
• “Policy conditions” are the criteria which determine whether a user shall use this policy or try the next.<br />
• Click on “Add”<br />
o The criteria which should be checked for each Remote Access Policy are up <strong>to</strong> the system<br />
opera<strong>to</strong>rs and depend <strong>to</strong> a large extent on how allocation is <strong>to</strong> take place.<br />
Some standard options may be:<br />
“NAS-Port-Type” adding “Ethernet”, “Wireless – IEEE802.11” and “Wireless – Other” “Windows-Groups” adding<br />
“Domain Users” and, for example, “Quarantine” or “WiFi VLAN10” or other groups from AD. NB: The AD<br />
groups must be created first!<br />
• When the criteria have been determined, click on “Next”, select “Grant remote access permission” and<br />
click on “Next”.<br />
o Remote Access Policies may also be created which deny access <strong>to</strong> users. For example, all<br />
users belonging <strong>to</strong> the security group “Wireless Access Denied” will be assigned the criterion<br />
“Deny remote access permission”. But remember: the policies are handled in a predetermined<br />
order and users will obtain access <strong>to</strong> the first alternative which is appropriate. Hence it may be<br />
wise <strong>to</strong> specify all policies which use “Deny remote access permission” first.<br />
• Click on “Edit Profile…”<br />
o The properties which should be specified in the profile depend somewhat on the application but<br />
the following must be included:<br />
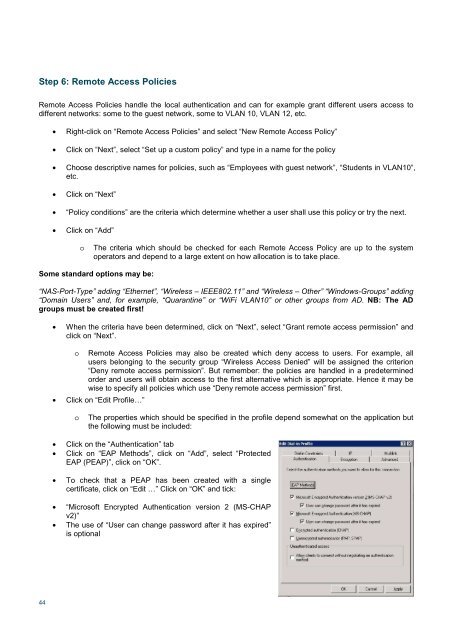
• Click on the “Authentication” tab<br />
• Click on “EAP Methods”, click on “Add”, select “Protected<br />
EAP (PEAP)”, click on “OK”.<br />
• To check that a PEAP has been created with a single<br />
certificate, click on “Edit …” Click on “OK” and tick:<br />
• “Microsoft Encrypted Authentication version 2 (MS-CHAP<br />
v2)”<br />
• The use of “User can change password after it has expired”<br />
is optional


