
Create successful ePaper yourself
Turn your PDF publications into a flip-book with our unique Google optimized e-Paper software.
60<br />
Chapter 6. Creating an Original Pattern<br />
Creating a pattern<br />
Two methods of creating an original pattern are available: realtime recording (a method similar to recording on a tape recorder<br />
or MD recorder), and step recording (a method by which simple button operations are used to record the pattern).<br />
* If you edit another pattern, switch to Song mode, or turn off the power without saving the pattern you recorded or edited, your edits will<br />
be lost. ➔ “Saving a pattern” (p. 20)<br />
Recording as you perform (Realtime Recording)<br />
Here’s how you can record your performance on the D2’s D-<br />
FIELD controller or an external MIDI keyboard.<br />
1. Press [PATTERN] to enter Pattern mode.<br />
2. Turn [VALUE] to select the number of the pattern that<br />
you wish to create, and press [ENTER].<br />
3. Press [PART SELECT].<br />
4. Press a part button [R] or [1]–[7] so that the part you<br />
wish to record is the current part.<br />
The part being recorded can also be switched during<br />
recording.<br />
5. Select a patch.<br />
➔ Selecting a sound (Patch/Rhythm set) (p. 18)<br />
6. Press [ ].<br />
[ ] will light, and the D2 will be in REC STANDBY<br />
mode.<br />
7. Make settings for the pattern.<br />
Press [ENTER] to select a parameter, and turn [VALUE]<br />
to set its value. Refer to “List of pattern settings.”<br />
8. Press [ ] to begin realtime recording.<br />
Your performance, including operations on the D-FIELD<br />
will be recorded.<br />
9. To stop recording, press [ ].<br />
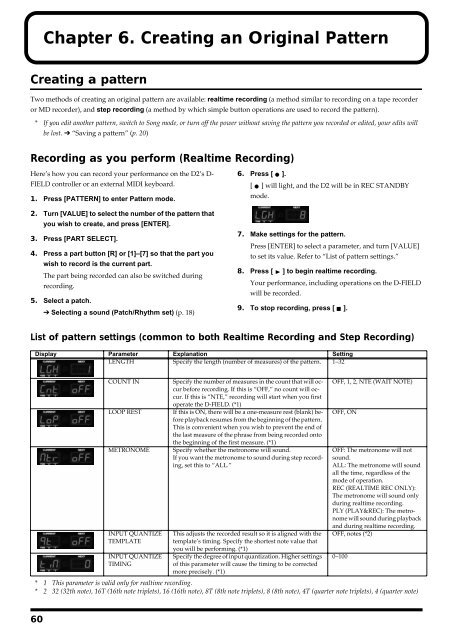
List of pattern settings (common to both Realtime Recording and Step Recording)<br />
Display Parameter Explanation Setting<br />
LENGTH Specify the length (number of measures) of the pattern. 1–32<br />
COUNT IN Specify the number of measures in the count that will occur<br />
before recording. If this is “OFF,” no count will occur.<br />
If this is “NTE,” recording will start when you first<br />
operate the D-FIELD. (*1)<br />
LOOP REST If this is ON, there will be a one-measure rest (blank) before<br />
playback resumes from the beginning of the pattern.<br />
This is convenient when you wish to prevent the end of<br />
the last measure of the phrase from being recorded onto<br />
the beginning of the first measure. (*1)<br />
METRONOME Specify whether the metronome will sound.<br />
If you want the metronome to sound during step recording,<br />
set this to “ALL.”<br />
INPUT QUANTIZE<br />
TEMPLATE<br />
INPUT QUANTIZE<br />
TIMING<br />
This adjusts the recorded result so it is aligned with the<br />
template’s timing. Specify the shortest note value that<br />
you will be performing. (*1)<br />
Specify the degree of input quantization. Higher settings<br />
of this parameter will cause the timing to be corrected<br />
more precisely. (*1)<br />
OFF, 1, 2, NTE (WAIT NOTE)<br />
OFF, ON<br />
OFF: The metronome will not<br />
sound.<br />
ALL: The metronome will sound<br />
all the time, regardless of the<br />
mode of operation.<br />
REC (REALTIME REC ONLY):<br />
The metronome will sound only<br />
during realtime recording.<br />
PLY (PLAY&REC): The metronome<br />
will sound during playback<br />
and during realtime recording.<br />
OFF, notes (*2)<br />
* 1 This parameter is valid only for realtime recording.<br />
* 2 32 (32th note), 16T (16th note triplets), 16 (16th note), 8T (8th note triplets), 8 (8th note), 4T (quarter note triplets), 4 (quarter note)<br />
0–100