Create successful ePaper yourself
Turn your PDF publications into a flip-book with our unique Google optimized e-Paper software.
Chapter 6. Creating an Original Pattern<br />
Inputting notes one by one<br />
(Step Recording)<br />
1. Press [PATTERN] to enter Pattern mode.<br />
2. Turn [VALUE] to select the number of the pattern that<br />
you wish to create, and press [ENTER].<br />
3. Press [PART SELECT].<br />
4. Press a part button [R] or [1]–[7] to make the current<br />
part the part that you wish to record.<br />
The part to be recorded can also be switched while<br />
recording.<br />
5. Press [ ].<br />
[ ] will light, and the D2 will be in REC STANDBY<br />
mode.<br />
6. Make pattern settings.<br />
Press [ENTER] to select the desired parameter, and turn<br />
[VALUE] to change its setting. Refer to the “List of<br />
pattern settings” (p. 60).<br />
7. Press [ ] to begin step recording.<br />
62<br />
Input notes. Refer to “Inputting notes.”<br />
8. To stop recording, press [ ].<br />
If you wish to connect an external keyboard and record, turn<br />
Auto Channel (p. 77) to “ON.”<br />
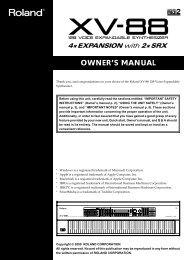
The display during step recording<br />
The CURRENT display will indicate the measure and beat<br />
being recorded. The NEXT display will indicate the note<br />
number (pitch), velocity (strength), and duration (length) of<br />
the note (event) at the note input location (grid line).<br />
(Example) Measure 2 beat 3, note pitch C4<br />
* If the location of the event is between that grid line and the<br />
next, a dot will be displayed after the beat.<br />
* If the grid line has no event, the NEXT display will indicate<br />
“—”.<br />
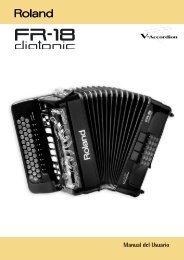
When you press and hold [HOLD], the CURRENT display<br />
will indicate the location (tick) in 1/96th of a beat.<br />
(Example) 7th tick of beat 3, note pitch E5<br />
The grid line is also indicated by the beat scan indicator that<br />
is blinking.<br />
fig.BeatScan.j<br />
Blink<br />
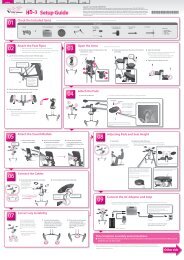
How the note length is displayed<br />
For notes that have already been input, both [NOTE TYPE]<br />
and [GATE TIME] will indicate the length (duration) of the<br />
sound.<br />
The first digit of the NEXT display indicates the number of<br />
beats, and the second and third digits indicate the number of<br />
ticks that the sound will continue.<br />
(Example) The first beat of the first measure is two beats and<br />
35 ticks long<br />
If the duration is longer than 9 beats and 95 ticks, the<br />
CURRENT display will also be used to indicate the duration.<br />
(Example) 13 beats and 58 ticks<br />
Only notes specified by the REC FUNCTION [NOTE<br />
NUMBER] will be displayed.