User Manual • Benutzerhandbuch • Manuel de l'utilisateur • Manuale ...
User Manual • Benutzerhandbuch • Manuel de l'utilisateur • Manuale ...
User Manual • Benutzerhandbuch • Manuel de l'utilisateur • Manuale ...

Create successful ePaper yourself
Turn your PDF publications into a flip-book with our unique Google optimized e-Paper software.
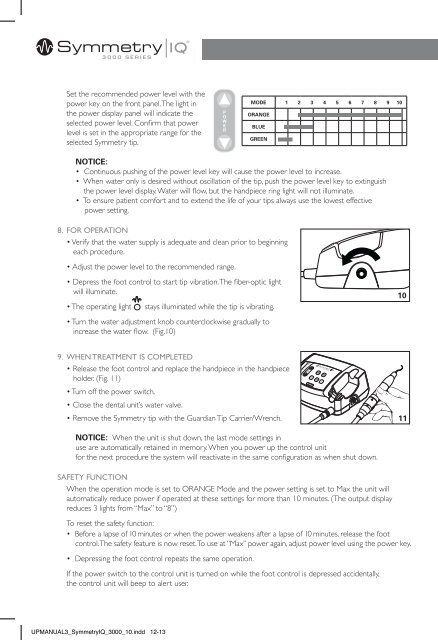
Set the recommen<strong>de</strong>d power level with the<br />
power key on the front panel. The light in<br />
the power display panel will indicate the<br />
selected power level. Confirm that power<br />
level is set in the appropriate range for the<br />
selected Symmetry tip.<br />
MODE 1 2 3 4 5 6 7 8 9 10<br />
ORANGE<br />
BlUE<br />
GREEN<br />
NOTICE:<br />
<strong>•</strong> Continuous pushing of the power level key will cause the power level to increase.<br />
<strong>•</strong> When water only is <strong>de</strong>sired without oscillation of the tip, push the power level key to extinguish<br />
the power level display. Water will flow, but the handpiece ring light will not illuminate.<br />
<strong>•</strong> To ensure patient comfort and to extend the life of your tips always use the lowest effective<br />
power setting.<br />
8. For operation<br />
<strong>•</strong> Verify that the water supply is a<strong>de</strong>quate and clean prior to beginning<br />
each procedure.<br />
<strong>•</strong> Adjust the power level to the recommen<strong>de</strong>d range.<br />
<strong>•</strong> Depress the foot control to start tip vibration. The fiber-optic light<br />
will illuminate.<br />
<strong>•</strong> The operating light stays illuminated while the tip is vibrating.<br />
<strong>•</strong> Turn the water adjustment knob counterclockwise gradually to<br />
increase the water flow. (Fig.10)<br />
9. When treatment is completeD<br />
<strong>•</strong> Release the foot control and replace the handpiece in the handpiece<br />
hol<strong>de</strong>r. (Fig. 11)<br />
<strong>•</strong> Turn off the power switch.<br />
<strong>•</strong> Close the <strong>de</strong>ntal unit’s water valve.<br />
<strong>•</strong> Remove the Symmetry tip with the Guardian Tip Carrier/Wrench.<br />
NOTICE: When the unit is shut down, the last mo<strong>de</strong> settings in<br />
use are automatically retained in memory. When you power up the control unit<br />
for the next procedure the system will reactivate in the same configuration as when shut down.<br />
saFety FUnction<br />
When the operation mo<strong>de</strong> is set to ORANGE Mo<strong>de</strong> and the power setting is set to Max the unit will<br />
automatically reduce power if operated at these settings for more than 10 minutes. (The output display<br />
reduces 3 lights from “Max” to “8”)<br />
To reset the safety function:<br />
<strong>•</strong> Before a lapse of 10 minutes or when the power weakens after a lapse of 10 minutes, release the foot<br />
control. The safety feature is now reset. To use at “Max” power again, adjust power level using the power key.<br />
<strong>•</strong> Depressing the foot control repeats the same operation.<br />
If the power switch to the control unit is turned on while the foot control is <strong>de</strong>pressed acci<strong>de</strong>ntally,<br />
the control unit will beep to alert user.<br />
2<br />
MIN<br />
4<br />
6<br />
8<br />
10<br />
MAX<br />
P<br />
o<br />
w<br />
e<br />
r<br />
M<br />
W<br />
7<br />
8<br />
preset memory FUnction<br />
The control unit can be preset for water mo<strong>de</strong>, power setting and operating mo<strong>de</strong>. To set the <strong>de</strong>sired preset<br />
conditions into memory follow the procedure below:<br />
<strong>•</strong> Set the <strong>de</strong>sired levels. (operation mo<strong>de</strong>, water mo<strong>de</strong> and power setting)<br />
<strong>•</strong> Push and hold the memory button for at least 2 seconds. The memory light will illuminate and the<br />
control unit will beep. The settings are now in memory.<br />
ClEANING AND STERIlIZATION<br />
Clean and sterilize prior to first use and after each patient as noted below. Autoclave sterilization is<br />
required for handpiece and replacement tips prior to first use and after each patient. Do not sterilize by<br />
ultraviolet light. Cover the control unit with a barrier or wipe clean with a pH neutral surface disinfectant. The<br />
following cleaning and/or sterilization procedures are recommen<strong>de</strong>d for the control unit, foot control<br />
or handpiece cord.<br />
CAUTION: Do not sterilize the control unit, power cord, foot control, water tube, irrigation connector,<br />
handpiece cord including the cover, lamp, o-ring, tip card or spanner wrenches.<br />
proceDUres For the symmetry Unit<br />
1. Turn off the power switch.<br />
2. Remove the tip from the handpiece using the Guardian Tip Carrier/Wrench. (See Fig. 8)<br />
3. Remove the handpiece from the handpiece cord as <strong>de</strong>scribed in Installation and Assembly:<br />
Handpiece Connection.<br />
4. Wipe the control unit, foot control or handpiece cord with a clean cloth dampened with a surface<br />
disinfectant. Do not spray disinfectant solution directly on the control unit.<br />
5. The use of an abrasive wipe or cleaning solution will damage the surface finish of the control unit.<br />
proceDUres For the symmetry hanDpiece<br />
1. Clean the outer surface of the handpiece by wiping with a soft cloth dampened with pH neutral<br />
surface disinfection solution (not containing phenols). Do not spray the cleaning solution directly<br />
on the handpiece.<br />
2. Wipe <strong>de</strong>bris off the end of the optic fibers at the handpiece with an alcohol soaked cotton swab.<br />
3. Place the handpiece in a cassette or sterilization pouch and seal.<br />
4. Autoclave the handpiece for 15 min. at 273˚F/134˚C.<br />
proceDUres For symmetry piezo tips<br />
1. Clean, disinfect, inspect and steam sterilize before each use.<br />
2. Tips remain in the Guardian wrench during the complete cleaning, disinfection and sterilization<br />
reprocessing cycle.<br />
3. Clean piezo tips using ultrasonic cleaner or thermo disinfector.<br />
4. Steam sterilize for at least 20 min. at 250˚F/121˚C, or 5 min. at 273˚F/134˚C.<br />
5. Do not heat above 350˚F/177˚C.<br />
6. Do not expose to phenols, iodophors or dry heat sterilization.*<br />
* Detailed care and maintenance instructions are available upon request or go to Hu-Friedy.com.<br />
CAUTION: Do not place the handpiece on the bottom shelf of the sterilizer. To prevent exposure to<br />
excess heat, place handpiece and tips on the middle and top shelves of the sterilizer.<br />
UPMANUAL3_SymmetryIQ_3000_10.indd 12-13 1/24/11 4:30 PM<br />
13