

Continental L-Head Overhaul Manual - Igor Chudov
Continental L-Head Overhaul Manual - Igor Chudov
Continental L-Head Overhaul Manual - Igor Chudov

You also want an ePaper? Increase the reach of your titles
YUMPU automatically turns print PDFs into web optimized ePapers that Google loves.
Page 34 CONTINENTAL L-HEAD ENGINE MANUAL<br />
REMOVING WATER PUMP<br />
The water pump assembly can be removed from<br />
the engine as a unit for service or repair in the<br />
following manner:<br />
1. Remove fan by taking out four cap screws.<br />
2. Loosen generator so that fan belt can be<br />
slacked off enough to slide over pulley.<br />
3. Remove nuts and lockwashers holding the<br />
pump body to the front of the block and remove<br />
the pump assembly.<br />
Figure 75--Removing Wafer Pump<br />
DISASSEMBLY OF WATER PUMP<br />
When replacement of any internal parts becomes<br />
necessary, disassembly must be in the following<br />
sequence in order to prevent damage to the pump.<br />
1. Before removing pump use puller to remove<br />
fan hub (17) from shaft.<br />
2. Remove cap screws attaching pump to engine<br />
(20) (21).<br />
DRIVE SHA FT<br />
OUT IN THIS<br />
DIRECTION<br />
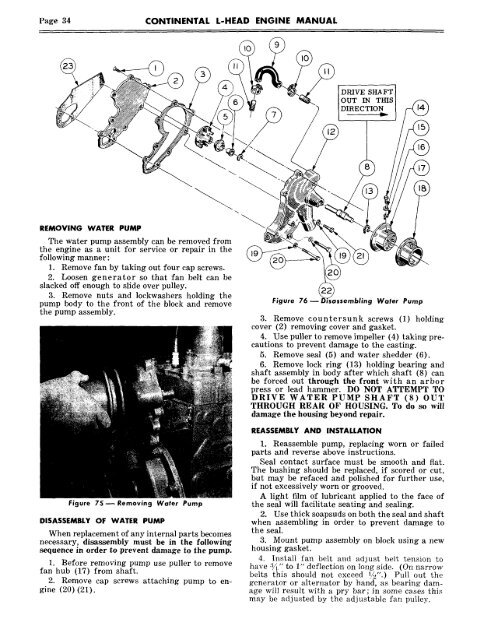
Figure 76-- fssembling Water Pump<br />
3. Remove countersunk screws (1) holding"<br />
cover (2) removing cover and gasket.<br />
4. Use puller to remove impeller (4) taking precautions<br />
to prevent damage to the casting.<br />
5. Remove seal (5) and water shedder (6).<br />
6. Remove lock ring (13) holding bearing and<br />
shaft assembly in body after which shaft (8) can<br />
be forced out through the front with an arbor<br />
press or lead hammer. DO NOT ATTEMPT TO<br />
DRIVE WATER PUMP SHAFT (8) OUT<br />
THROUGH REAR OF HOUSING. To do so will<br />
damage the housing beyond repair.<br />
REASSEMBLY AND INSTALLATION<br />
1. Reassemble pump, replacing worn or failed<br />
parts and reverse above instructions.<br />
Seal contact surface must be smooth and flat.<br />
The bushing should be replaced, if scored or ~ut,<br />
but may be refaced and polished for further use,<br />
if not excessively worn or grooved.<br />
A light film of lubricant applied to the face of<br />
the seal will facilitate seating and sealing.<br />
2. Use thick soapsuds on both the seal and shaft<br />
when assembling in order to prevent damage to<br />
the seal.<br />
3. Mount pump assembly on block using a new<br />
housing gasket.<br />
4. Install fan belt and adjust be~t tension to<br />
have :~/~," to 1" deflection on long side. (On narrow<br />
belts this should not exceed ~,/~".) Pull out the<br />
generator or alternator by hand, as bearing damage<br />
will result with a pry bar; in some cases this<br />
may be adjusted by the adjustable fan pulley.


