

Continental L-Head Overhaul Manual - Igor Chudov
Continental L-Head Overhaul Manual - Igor Chudov
Continental L-Head Overhaul Manual - Igor Chudov

You also want an ePaper? Increase the reach of your titles
YUMPU automatically turns print PDFs into web optimized ePapers that Google loves.
ASSEMBLING OIL SEALS IN FILLER<br />
BLOCK AND OIL GUARD<br />
<strong>Continental</strong> L-head engines have 3 types of<br />
crankshaft and oil pan seals.<br />
The first type is jute packing which is used in<br />
sealing the filler block and oil guard in block to<br />
crankshaft.<br />
The second type is a neoprene seal which is used<br />
in sealing the oil pan to the filler block.<br />
The third type is a neoprene circular spring type<br />
which is currently used on the N-series engines.<br />
JUTE TYPE OIL SEALS<br />
First, remove the filler block and oil guard,<br />
the latter being the semi-circular die casting which<br />
fits in the cylinder block just to the rear of the rear<br />
bearing bore. Clean out the grooves thoroughly<br />
and clean the o~ater surface of this oil guard so as<br />
to remove all dried cement and grease.<br />
Jute packing for crankshaft seal as it is received<br />
is approximately one-third larger in diameter than<br />
the width of the groove. To fit the grooves in the<br />
filler block, this must be crushed in a vise or flattened<br />
with a hammer on a flat surface so the jute<br />
packing is narrow enough to fit into the grooves.<br />
JUTE<br />
Figure 160 -- Top Half of Rear Seal<br />
Next, press it into the grooves of both the filler<br />
block and the oil guard. Then, using a piston pin,<br />
a smooth hammer handle or some other instrument<br />
with a rounded ~surface, iron this packing into the<br />
groove so that it is seated firmly and expanded so<br />
that it seizes the sides.<br />
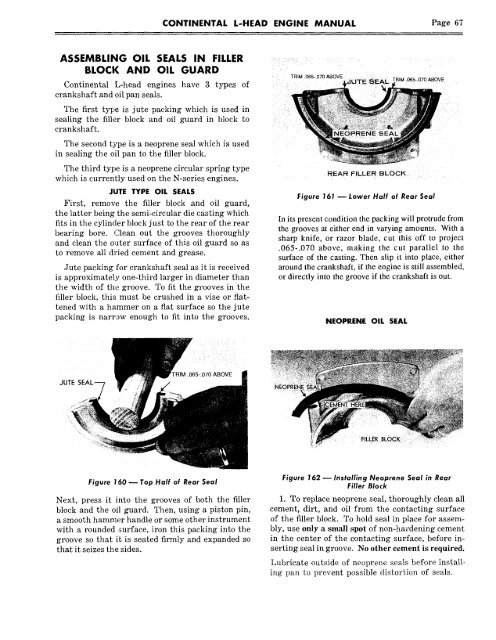
CONTINENTAL L-HEAD ENGINE MANUAL Page 67<br />
TRIM .065-.070 ABOVE<br />
REAR FILLER BLOCK<br />
TRIM .065-.070 ABOVE<br />
Figure |61 m Lower Half of Rear Seal<br />
In its present condition the packing will protrude from<br />
the grooves at either end in varying amounts. With a<br />
sharp knife, or razor blade, cut this off to project<br />
.065-.070 above, making the cut parallel to the<br />
surface of the casting. Then slip it into place, either<br />
around the crankshaft, if the engine is still assembled,<br />
or directly into the groove if the crankshaft is out.<br />
NEOPRENE OIL SEAL<br />
Figure 162 ~ Installing Neoprene Seal in Rear<br />
Filler Block<br />
1. To replace neoprene seal, thoroughly clean all<br />
cement, dirt, and oil from the contacting surface<br />
of the filler block. To hold seal in place for assembly,<br />
use only a small spot of non-hardening cement<br />
in the center of the contacting surface, before inserting<br />
seal in groove. No other cement is required.<br />
Lubricate outside of neoprene seals before installing<br />
pan to prevent possible distortion of seals.


