

Continental L-Head Overhaul Manual - Igor Chudov
Continental L-Head Overhaul Manual - Igor Chudov
Continental L-Head Overhaul Manual - Igor Chudov

You also want an ePaper? Increase the reach of your titles
YUMPU automatically turns print PDFs into web optimized ePapers that Google loves.
Page 48 CONTINENTAL L-HEAD ENGINE MANUAL<br />
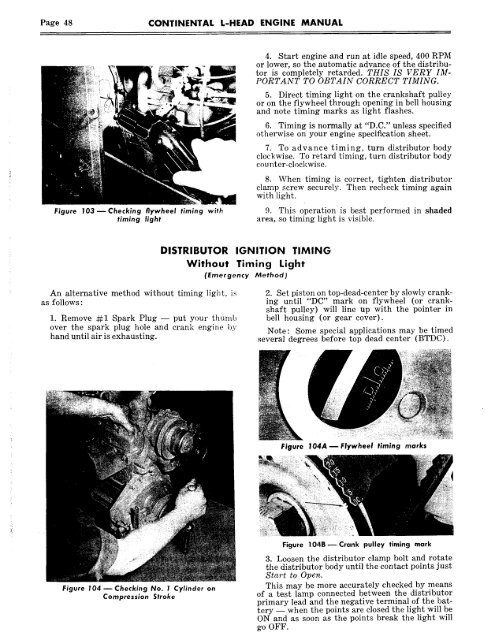
Figure 103 reChecking flywheel timing with<br />
timing light<br />
An alternative method without timing light, is<br />
as follows :<br />
1. Remove ¢~1 Spark Plug -- put your thumb<br />
over the spark plug hole and crank engine by<br />
hand until air is exhausting.<br />
Figure 104 D Checking No. I Cylinder on<br />
Compression Stroke<br />
DISTRIBUTOR IGNITION TIMING<br />
Without Timing Light<br />
(Emergency Method)<br />
4. Start engine and run at idle speed, 400 RPM<br />
or lower, so the automatic advance of the distributor<br />
is completely retarded. THIS IS VERY IM-<br />
PORTANT TO OBTAIN CORRECT TIMING.<br />
5. Direct timing light on the crankshaft pulley<br />
or on the flywheel through opening in bell housing<br />
and note timing marks as light flashes.<br />
6. Timing is normally at "D.C." unless specified<br />
otherwise on your engine specification sheet.<br />
7. To advance timing, turn distributor body<br />
clockwise. To retard timing, turn distributor body<br />
cou nter-clockwise.<br />
8. When timing is correct, tighten distributor<br />
clamp screw securely. Then recheck timing again<br />
with light.<br />
9. This operation is best performed in shaded<br />
area, so timing light is visible.<br />
2. Set piston on top-dead-center by slowly cranking<br />
until "DC" mark on flywheel (or crank~<br />
shaft pulley) will line up with the pointer in<br />
bell housing (or gear cover).<br />
Note: Some special applications may be timed<br />
several degrees before top dead center (BTDC).<br />
Figure I04A ~ Flywheel timing marks<br />
Figure 104BDCrank pulley timing mark<br />
3. Loosen the distributor clamp bolt and rotate<br />
the distributor body until the contact points just<br />
Start to Open.<br />
This may be more accurately checked by means<br />
of a test lamp connected between the distributor<br />
primary lead and the negative terminal of the battery<br />
-- when the points are closed the light will be<br />
ON and as soon as the points break the light will<br />
go OFF.


