

Continental L-Head Overhaul Manual - Igor Chudov
Continental L-Head Overhaul Manual - Igor Chudov
Continental L-Head Overhaul Manual - Igor Chudov

You also want an ePaper? Increase the reach of your titles
YUMPU automatically turns print PDFs into web optimized ePapers that Google loves.
2. The 3 piece oil ring should be installed first<br />
on the piston, from the top side so skirt will not<br />
be scratched.<br />
Figure |37--Install Tapered Rings with "Top"<br />
Side Up<br />
3. TO install the balance of the rings, use a ring<br />
tool with recess side up and place the ring in<br />
with the bottom side up. Start with the lowest<br />
ring first.<br />
Some piston rings are taper faced. These are<br />
clearly marked "TOP" on the side to be up when<br />
assembled on piiston.<br />
4. Position ring in the tool so the expanding<br />
fingers will fully engage both ends.<br />
5. Apply pressure on handles so ring is completely<br />
expanded. Pass the expanded ring and tool<br />
recessed side down over the piston to the proper<br />
groove.<br />
CAUTION<br />
if piston is equipped with a steel groove insert, this must be<br />
installed on top of the number one ring. (The steel groove<br />
insert is not part of the re-ring kit ~ this can be re-used when<br />
replacing rings.)<br />
6. Check the ring side clearance at various positions<br />
with a feeler in accordance with the tolerances<br />
shown on the Limits and Clearance Chart.<br />
Figure 138--Checking Ring Clearance in Groove<br />
CONTINENTAL L-HEAD ENGINE MANUAL Page 61<br />
CRANKSHAFT AND MAIN<br />
BEARINGS<br />
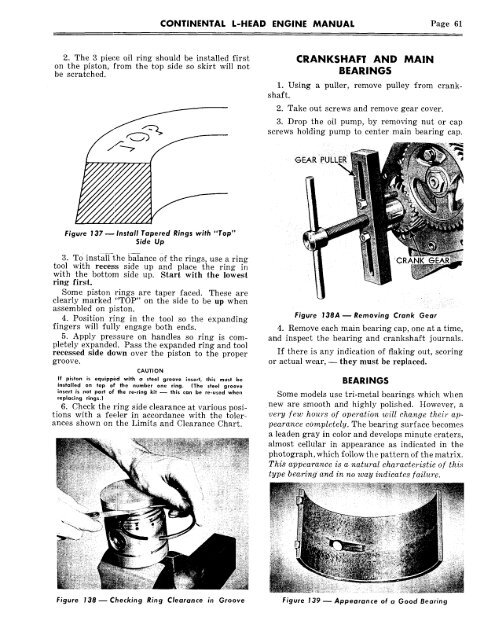
1. Using a puller, remove pulley from crankshaft.<br />
2. Take out screws and remove gear cover.<br />
3. Drop the oil pump, by removing nut or cap<br />
screws holding pump to center main bearing cap.<br />
GEAR PULLER<br />
CRANK GEAR<br />
Figur.e 138A m Removing Crank Gear<br />
4. Remove each main bearing cap, one at a time,<br />
and inspect the bearing and crankshaft journals.<br />
If there is any indication of flaking out, scoring<br />
or actual wear, -- they must be replaced.<br />
BEARINGS<br />
Some models use tri-metal bearings which when<br />
new are smooth and highly polished. However, a<br />
very few hours of operation will change their appearance<br />
completely. The bearing surface becomes<br />
a leaden gray in color and develops minute craters,<br />
almost cellular in appearance as indicated in the<br />
photograph, which follow the pattern of the matrix.<br />
This appearance is a natural characteristic of this<br />
type bearing’ and in no way indicates failure.<br />
Figure 139 ~ Appearance of a Good Bearing


