

Continental L-Head Overhaul Manual - Igor Chudov
Continental L-Head Overhaul Manual - Igor Chudov
Continental L-Head Overhaul Manual - Igor Chudov

Create successful ePaper yourself
Turn your PDF publications into a flip-book with our unique Google optimized e-Paper software.
Page 62 CONTINENTAL L-HEAD ENGINE MANUAL<br />
Figure 140 m Bearing Damage Due to Corrosion<br />
Figure 141 --Scored Bearing Due to Dirt or<br />
Lack of Oil<br />
5. If the visual inspection appears satisfactory,<br />
they should be removed and checked for thickness<br />
using a ball micrometer.<br />
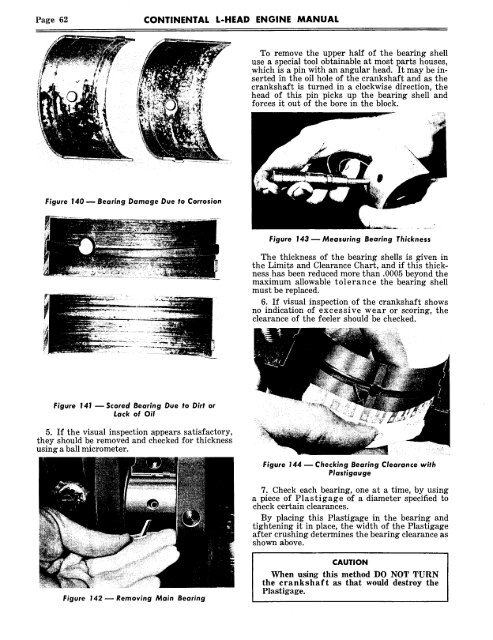
Figure 142 ~ Removing Main Bearing<br />
To remove the upper half of the bearing shell<br />
use a special tool obtainable at most parts houses,<br />
which is a pin with an angular head. It may be inserted<br />
in the oil hole of the crankshaft and as the<br />
crankshaft is turned in a clockwise direction, the<br />
head of this pin picks up the bearing shell and<br />
forces it out of the bore in the block.<br />
Figure 143 ~ Measuring Bearing Thickness<br />
The thickness of the bearing shells is given in<br />
the Limits and Clearance Chart, and if this thickness<br />
has been reduced more than .0005 beyond the<br />
maximum allowable tolerance the bearing shell<br />
must be replaced.<br />
6. If visual inspection of the crankshaft shows<br />
no indication of excessive wear or scoring, the<br />
clearance of the feeler should be checked.<br />
Figure 144- Checking Bearing Clearance with<br />
Plastigauge<br />
7. Check each bearing, one at a time, by using<br />
a piece of Plastigage of a diameter specified to<br />
check certain clearances.<br />
By placing this Plastigage in the bearing and<br />
tightening it in place, the width of the Plastigage<br />
after crushing determines the bearing clearance as<br />
shown above.<br />
CAUTION<br />
When using this method DO NOT TURN<br />
the crankshaft as that would destroy the<br />
Plastigage.


