Continental L-Head Overhaul Manual - Igor Chudov
Continental L-Head Overhaul Manual - Igor Chudov
Continental L-Head Overhaul Manual - Igor Chudov
Create successful ePaper yourself
Turn your PDF publications into a flip-book with our unique Google optimized e-Paper software.
Page 68 CONTINENTAL L-HEAD ENGINE MANUAL<br />
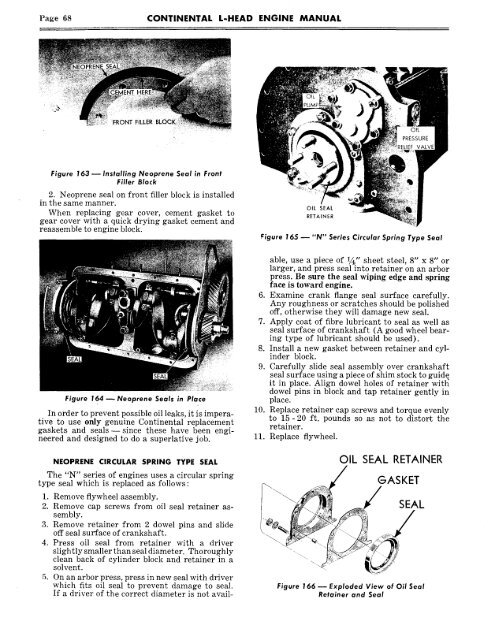
FRONT FILLER BLOCK,<br />
Figure 163 ~ Installing Neoprene Seal in Front<br />
Filler Block<br />
2. Neoprene seal on front filler block is installed<br />
in the same manner.<br />
When replacing gear cover, cement gasket to<br />
gear cover with a quick drying gasket cement and<br />
reassemble to engine block.<br />
Figure 164 ~ Neoprene Seals in Place<br />
In order to prevent possible oil leaks, it is imperative<br />
to use only genuine <strong>Continental</strong> replacement<br />
gaskets and seals--since these have been engineered<br />
and designed to do a superlative job.<br />
NEOPRENE CIRCULAR SPRING TYPE SEAL<br />
The "N" series of engines uses a circular spring<br />
type seal which is replaced as follows:<br />
1. Remove flywheel assembly.<br />
2. Remove cap screws from oil seal retainer assembly.<br />
3. Remove retainer from 2 dowel pins and slide<br />
off seal surface of crankshaft.<br />
4. Press oil seal from retainer with a driver<br />
slightly smaller than seal diameter. Thoroughly<br />
clean back of cylinder block and retainer in a<br />
solvent.<br />
5. On an arbor press, press in new seal with driver<br />
which fits oil seal to prevent damage to seal.<br />
If a driver of the correct diameter is not avail-<br />
OIL SEAL<br />
RETAINER<br />
f:igure 165 ~ "N" Series Circular Spring Type Seal<br />
able, use a piece of 1/~,, sheet steel, 8" x 8" or<br />
larger, and press seal into retainer on an arbor<br />
press. Be sure the seal wiping edge and spring<br />
face is toward engine.<br />
6. Examine crank flange seal surface carefully.<br />
Any roughness or scratches should be polished<br />
off, otherwise they will damage new seal.<br />
7. Apply coat of fibre lubricant to seal as well as<br />
seal surface of crankshaft (A good wheel bearing<br />
type of lubricant should be used).<br />
8. Install a new gasket between retainer and cylinder<br />
block.<br />
9. Carefully slide seal assembly over crankshaft<br />
seal surface using a piece of shim stock to guide<br />
it in place. Align dowel holes of retainer witl~<br />
dowel pins in block and tap retainer gently in<br />
place.<br />
10. Replace retainer cap screws and torque evenly<br />
to 15-20 ft. pounds so as not to distort the<br />
retainer.<br />
11. Replace flywheel.<br />
OIL SEAL RETAINER<br />
GASKET<br />
SEAL<br />
Figure 166 m Exploded View of Oil Seal<br />
Retainer and Seal


