

Continental L-Head Overhaul Manual - Igor Chudov
Continental L-Head Overhaul Manual - Igor Chudov
Continental L-Head Overhaul Manual - Igor Chudov

Create successful ePaper yourself
Turn your PDF publications into a flip-book with our unique Google optimized e-Paper software.
Page 58 CONTINENTAL L-HEAD ENGINE MANUAL<br />
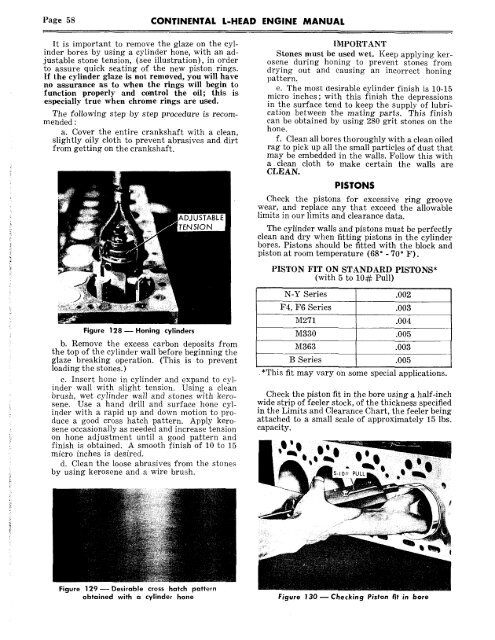
It is important to remove the glaze on the cylinder<br />
bores by using a cylinder hone, with an adjustable<br />
stone tension, (see illustration), in order<br />
to assure quick seating of the new piston rings.<br />
If the cylinder glaze is not removed, you will have<br />
no assurance as to vchen the rings will begin to<br />
function properly and control the oil; this is<br />
especially true when chrome rings are used.<br />
The following step by step procedure is recommended<br />
:<br />
a. Cover the entire crankshaft with a clean,<br />
slightly oily cloth to prevent abrasives and dirt<br />
from getting on the crankshaft.<br />
Figure 128mHoning cylinders<br />
b. Remove the excess carbon deposits from<br />
the top of the cylinder wall before beginning the<br />
glaze breaking operation. (This is to prevent<br />
loading the stones.)<br />
c. Insert hone in cylinder and expand to cylinder<br />
wall with slight tension. Using a clean<br />
brush, wet cylinder wall and stones with kerosene.<br />
Use a hand drill and surface hone cylinder<br />
with a rapid up and down motion to produee<br />
a good cross hatch pattern. Apply kerosene<br />
occasionally as needed and increase tension<br />
on hone adjustment until a good pattern and<br />
finish is obtained. A smooth finish of 10 to 15<br />
micro inches is desired.<br />
d. Clean the loose abrasives from the stones<br />
by using kerosene and a wire brush.<br />
IMPORTANT<br />
Stones must be used wet. Keep applying kerosene<br />
during honing to prevent stones from<br />
drying out and causing an incorrect honing<br />
pattern.<br />
e. The most desirable cylinder finish is 10-15<br />
micro inches; with this finish the depressions<br />
in the surface tend to keep the supply of lubrication<br />
between the mating parts. This finish<br />
can be obtained by using 280 grit stones on the<br />
hone.<br />
f. Clean all bores thoroughly with a clean oiled<br />
rag to pick up all the small particles of dust that<br />
may be embedded in the walls. Follow this with<br />
a clean cloth to make certain the walls are<br />
CLEAN.<br />
PISTONS<br />
Check the pistons for excessive ring groove<br />
wear. and replace any that exceed the allowable<br />
limits in our limits and clearance data.<br />
The cylinder walls and pistons must be perfectly<br />
clean and dry when fitting pistons in the cylinder<br />
bores. Pistons should be fitted with the block and<br />
piston at room temperature (68 ° - 70 ° F).<br />
PISTON FIT ON STANDARD PISTONS*<br />
(with 5 to 10~: Pull)<br />
N-Y Series .002<br />
F4, F6 Series .003<br />
M271 .004<br />
M330 .005<br />
M363 .003<br />
B Series .005<br />
*This fit may vary on some special applications.<br />
Check the piston fit in the bore using a half-inch<br />
wide strip of feeler stock, of the thickness specified<br />
in the Limits and Clearance Chart, the feeler being<br />
attached to a small scale of approximately 15 lbs.<br />
capacity.<br />
Figure 129 Desirable cross hatch pattern<br />
obtained with a cylinder hone Figure 130 ~ Checking Piston fit in bore


