

Continental L-Head Overhaul Manual - Igor Chudov
Continental L-Head Overhaul Manual - Igor Chudov
Continental L-Head Overhaul Manual - Igor Chudov

Create successful ePaper yourself
Turn your PDF publications into a flip-book with our unique Google optimized e-Paper software.
Page 56 CONTINENTAL L-HEAD ENGINE MANUAL<br />
ORIGINAL REFACED<br />
IF AREA UA" IS LESS THAN 50 % OF<br />
ORIGINAL, DISCARD VALVE<br />
Figure 121 ~ Allowable head thickness of<br />
refaced valves<br />
2. All valves having less than 50% margin thickness<br />
(outer edge of valve head) after refacing has<br />
been completed must be replaced. To check this<br />
dimension, compare the refaced valve with a new<br />
valve.<br />
Figure 122 ~ Checking valve face in "V" blocks<br />
3. Check all refaced or new valves in V-blocks<br />
with indicator to determine if the contact face is<br />
true with the stem within .002. If not, repeat the<br />
refacing operation.<br />
4. After the valves and seats have been refaced<br />
and reground, coat the seat lightly with Prussian<br />
blue and drop the valve into position, oscillating it<br />
slightly to transfer the blue pattern to the valve<br />
face. This should show a contact width of V16" to<br />
~2" and should fall well within the width of the<br />
valve face, leaving at least 1~4" on either side where<br />
Figure 123--Method of narrowing valve seats<br />
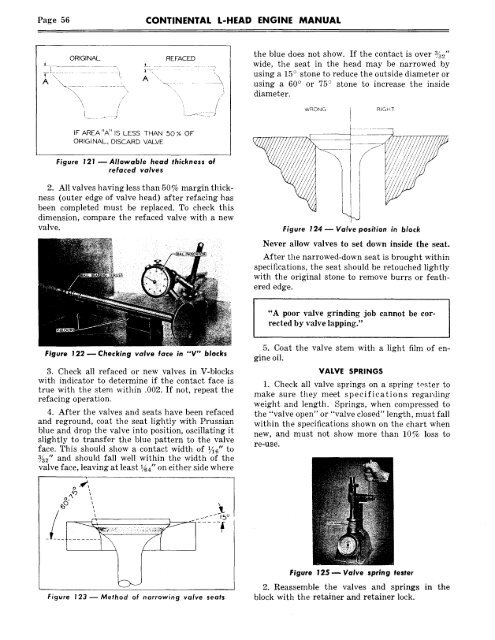
the blue does not show. If the contact is over ~5_0"<br />
wide, the seat in the head may be narrowed by<br />
using a 15 ° stone to reduce the outside diameter or<br />
using a 60 ° or 75 ° stone to increase the inside<br />
diameter.<br />
WRONG RIGHT<br />
Figure 124 -- Valve position in block<br />
Never allow valves to set down inside the seat.<br />
After the narrowed-down seat is brought within<br />
specifications, the seat should be retouched lightly<br />
with the original stone to remove burrs or feathered<br />
edge.<br />
"A poor valve grinding job cannot be corrected<br />
by valve lapping."<br />
5. Coat the valve stem with a light film of engine<br />
oil.<br />
VALVE SPRINGS<br />
1. Check all valve springs on a sprin~ tosser to<br />
make sure they meet specifications regarding<br />
weight and length. Springs, when compressed to<br />
the "valve open" or "valve closed" length, must fall<br />
within the specifications shown on the chart when<br />
new, and must not show more than 10% loss to<br />
re-use.<br />
Figure 125 ~ Valve spring tester<br />
2. Reassemble the valves and springs in the<br />
block with the retainer and retainer lock.


