Necromunda rulebook - Games Workshop
Necromunda rulebook - Games Workshop
Necromunda rulebook - Games Workshop
You also want an ePaper? Increase the reach of your titles
YUMPU automatically turns print PDFs into web optimized ePapers that Google loves.
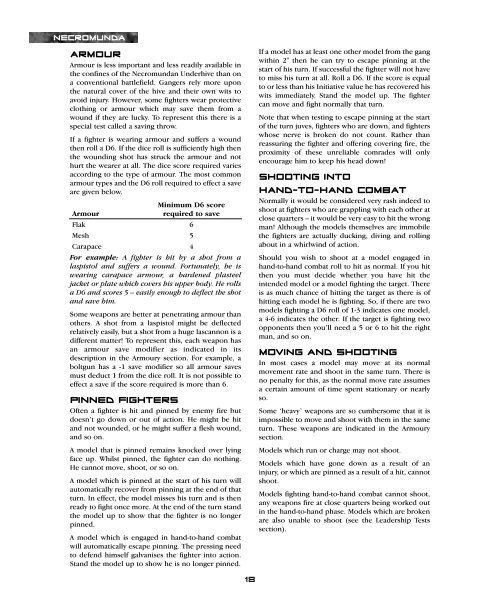
NECROMUNDA<br />
ARMOUR<br />
Armour is less important and less readily available in<br />
the confines of the <strong>Necromunda</strong>n Underhive than on<br />
a conventional battlefield. Gangers rely more upon<br />
the natural cover of the hive and their own wits to<br />
avoid injury. However, some fighters wear protective<br />
clothing or armour which may save them from a<br />
wound if they are lucky. To represent this there is a<br />
special test called a saving throw.<br />
If a fighter is wearing armour and suffers a wound<br />
then roll a D6. If the dice roll is sufficiently high then<br />
the wounding shot has struck the armour and not<br />
hurt the wearer at all. The dice score required varies<br />
according to the type of armour. The most common<br />
armour types and the D6 roll required to effect a save<br />
are given below.<br />
Minimum D6 score<br />
Armour required to save<br />
Flak 6<br />
Mesh 5<br />
Carapace 4<br />
For example: A fighter is hit by a shot from a<br />
laspistol and suffers a wound. Fortunately, he is<br />
wearing carapace armour, a hardened plasteel<br />
jacket or plate which covers his upper body. He rolls<br />
a D6 and scores 5 – easily enough to deflect the shot<br />
and save him.<br />
Some weapons are better at penetrating armour than<br />
others. A shot from a laspistol might be deflected<br />
relatively easily, but a shot from a huge lascannon is a<br />
different matter! To represent this, each weapon has<br />
an armour save modifier as indicated in its<br />
description in the Armoury section. For example, a<br />
boltgun has a -1 save modifier so all armour saves<br />
must deduct 1 from the dice roll. It is not possible to<br />
effect a save if the score required is more than 6.<br />
PINNED FIGHTERS<br />
Often a fighter is hit and pinned by enemy fire but<br />
doesn’t go down or out of action. He might be hit<br />
and not wounded, or he might suffer a flesh wound,<br />
and so on.<br />
A model that is pinned remains knocked over lying<br />
face up. Whilst pinned, the fighter can do nothing.<br />
He cannot move, shoot, or so on.<br />
A model which is pinned at the start of his turn will<br />
automatically recover from pinning at the end of that<br />
turn. In effect, the model misses his turn and is then<br />
ready to fight once more. At the end of the turn stand<br />
the model up to show that the fighter is no longer<br />
pinned.<br />
A model which is engaged in hand-to-hand combat<br />
will automatically escape pinning. The pressing need<br />
to defend himself galvanises the fighter into action.<br />
Stand the model up to show he is no longer pinned.<br />
18<br />
If a model has at least one other model from the gang<br />
within 2" then he can try to escape pinning at the<br />
start of his turn. If successful the fighter will not have<br />
to miss his turn at all. Roll a D6. If the score is equal<br />
to or less than his Initiative value he has recovered his<br />
wits immediately. Stand the model up. The fighter<br />
can move and fight normally that turn.<br />
Note that when testing to escape pinning at the start<br />
of the turn juves, fighters who are down, and fighters<br />
whose nerve is broken do not count. Rather than<br />
reassuring the fighter and offering covering fire, the<br />
proximity of these unreliable comrades will only<br />
encourage him to keep his head down!<br />
SHOOTING INTO<br />
HAND-TO-HAND COMBAT<br />
Normally it would be considered very rash indeed to<br />
shoot at fighters who are grappling with each other at<br />
close quarters – it would be very easy to hit the wrong<br />
man! Although the models themselves are immobile<br />
the fighters are actually ducking, diving and rolling<br />
about in a whirlwind of action.<br />
Should you wish to shoot at a model engaged in<br />
hand-to-hand combat roll to hit as normal. If you hit<br />
then you must decide whether you have hit the<br />
intended model or a model fighting the target. There<br />
is as much chance of hitting the target as there is of<br />
hitting each model he is fighting. So, if there are two<br />
models fighting a D6 roll of 1-3 indicates one model,<br />
a 4-6 indicates the other. If the target is fighting two<br />
opponents then you’ll need a 5 or 6 to hit the right<br />
man, and so on.<br />
MOVING AND SHOOTING<br />
In most cases a model may move at its normal<br />
movement rate and shoot in the same turn. There is<br />
no penalty for this, as the normal move rate assumes<br />
a certain amount of time spent stationary or nearly<br />
so.<br />
Some ‘heavy’ weapons are so cumbersome that it is<br />
impossible to move and shoot with them in the same<br />
turn. These weapons are indicated in the Armoury<br />
section.<br />
Models which run or charge may not shoot.<br />
Models which have gone down as a result of an<br />
injury, or which are pinned as a result of a hit, cannot<br />
shoot.<br />
Models fighting hand-to-hand combat cannot shoot,<br />
any weapons fire at close quarters being worked out<br />
in the hand-to-hand phase. Models which are broken<br />
are also unable to shoot (see the Leadership Tests<br />
section).


