Xilinx UG230 Spartan-3E FPGA Starter Kit Board User Guide
Xilinx UG230 Spartan-3E FPGA Starter Kit Board User Guide
Xilinx UG230 Spartan-3E FPGA Starter Kit Board User Guide

You also want an ePaper? Increase the reach of your titles
YUMPU automatically turns print PDFs into web optimized ePapers that Google loves.
Chapter 4: <strong>FPGA</strong> Configuration Options<br />
Programming via iMPACT<br />
After successfully compiling an <strong>FPGA</strong> design using the <strong>Xilinx</strong> development software, the<br />
design can be downloaded using the iMPACT programming software and the USB cable.<br />
To begin programming, connect the USB cable to the starter kit board and apply power to<br />
the board. Then, double-click Configure Device (iMPACT) from within Project<br />
Navigator, as shown in Figure 4-5.<br />
<strong>UG230</strong>_c4_06_022406<br />
Figure 4-5: Double-Click to Invoke iMPACT<br />
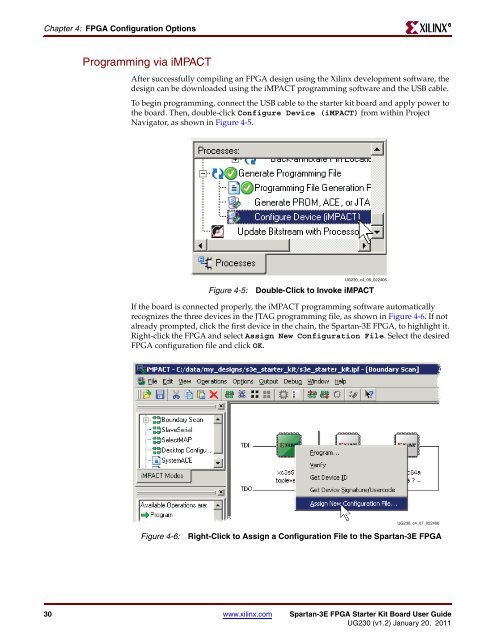
If the board is connected properly, the iMPACT programming software automatically<br />
recognizes the three devices in the JTAG programming file, as shown in Figure 4-6. If not<br />
already prompted, click the first device in the chain, the <strong>Spartan</strong>-<strong>3E</strong> <strong>FPGA</strong>, to highlight it.<br />
Right-click the <strong>FPGA</strong> and select Assign New Configuration File. Select the desired<br />
<strong>FPGA</strong> configuration file and click OK.<br />
<strong>UG230</strong>_c4_07_022406<br />
Figure 4-6: Right-Click to Assign a Configuration File to the <strong>Spartan</strong>-<strong>3E</strong> <strong>FPGA</strong><br />
30 www.xilinx.com <strong>Spartan</strong>-<strong>3E</strong> <strong>FPGA</strong> <strong>Starter</strong> <strong>Kit</strong> <strong>Board</strong> <strong>User</strong> <strong>Guide</strong><br />
<strong>UG230</strong> (v1.2) January 20, 2011<br />
R