warning - Whirlpool
warning - Whirlpool
warning - Whirlpool

Create successful ePaper yourself
Turn your PDF publications into a flip-book with our unique Google optimized e-Paper software.
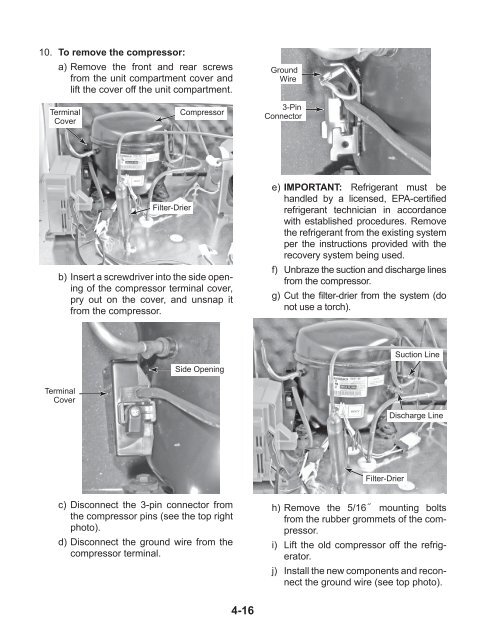
10. To remove the compressor:<br />
a) Remove the front and rear screws<br />
from the unit compartment cover and<br />
lift the cover off the unit compartment.<br />
Terminal<br />
Cover<br />
b) Insert a screwdriver into the side opening<br />
of the compressor terminal cover,<br />
pry out on the cover, and unsnap it<br />
from the compressor.<br />
Terminal<br />
Cover<br />
Filter-Drier<br />
Compressor<br />
Side Opening<br />
c) Disconnect the 3-pin connector from<br />
the compressor pins (see the top right<br />
photo).<br />
d) Disconnect the ground wire from the<br />
compressor terminal.<br />
4-16<br />
Ground<br />
Wire<br />
3-Pin<br />
Connector<br />
e) IMPORTANT: Refrigerant must be<br />
handled by a licensed, EPA-certified<br />
refrigerant technician in accordance<br />
with established procedures. Remove<br />
the refrigerant from the existing system<br />
per the instructions provided with the<br />
recovery system being used.<br />
f) Unbraze the suction and discharge lines<br />
from the compressor.<br />
g) Cut the filter-drier from the system (do<br />
not use a torch).<br />
Filter-Drier<br />
Suction Line<br />
Discharge Line<br />
h) Remove the 5/16˝ mounting bolts<br />
from the rubber grommets of the compressor.<br />
i) Lift the old compressor off the refrigerator.<br />
j) Install the new components and reconnect<br />
the ground wire (see top photo).