
You also want an ePaper? Increase the reach of your titles
YUMPU automatically turns print PDFs into web optimized ePapers that Google loves.
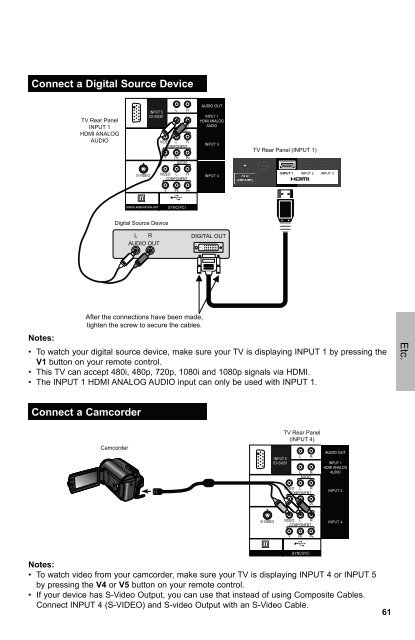
Connect a Digital Source Device<br />
TV Rear Panel<br />
INPUT 1<br />
HDMI ANALOG<br />
AUDIO<br />
TV Rear Panel (INPUT 1)<br />
75 Ω<br />
(VHF/UHF)<br />
INPUT 1 INPUT 2 INPUT 3<br />
Digital Source Device<br />
L R<br />
AUDIO OUT<br />
DIGITAL OUT<br />
After the connections have been made,<br />
tighten the screw to secure the cables.<br />
Notes:<br />
• To watch your digital source device, make sure your TV is displaying INPUT 1 by pressing the<br />
V1 button on your remote control.<br />
• This TV can accept 480i, 480p, 720p, 1080i and 1080p signals via HDMI.<br />
• The INPUT 1 HDMI ANALOG AUDIO input can only be used with INPUT 1.<br />
Etc.<br />
Connect a Camcorder<br />
Camcorder<br />
TV Rear Panel<br />
(INPUT 4)<br />
Notes:<br />
• To watch video from your camcorder, make sure your TV is displaying INPUT 4 or INPUT 5<br />
by pressing the V4 or V5 button on your remote control.<br />
• If your device has S-Video Output, you can use that instead of using Composite Cables.<br />
Connect INPUT 4 (S-VIDEO) and S-video Output with an S-Video Cable.<br />
61