MA-500TR Instruction Manual - ICOM Canada
MA-500TR Instruction Manual - ICOM Canada
MA-500TR Instruction Manual - ICOM Canada

You also want an ePaper? Increase the reach of your titles
YUMPU automatically turns print PDFs into web optimized ePapers that Google loves.
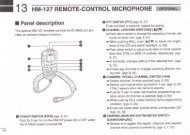
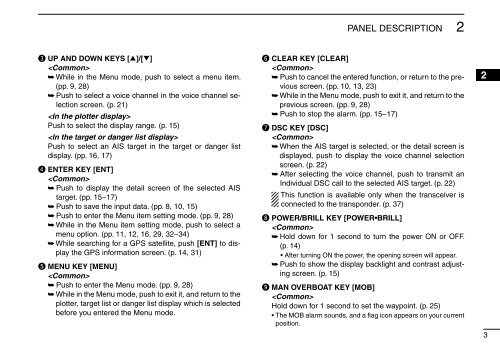
PANEL DESCRIPTION<br />
2<br />
e UP AND DOWN KEYS [∫]/[√]<br />
<br />
➥ While in the Menu mode, push to select a menu item.<br />
(pp. 9, 28)<br />
➥ Push to select a voice channel in the voice channel selection<br />
screen. (p. 21)<br />
<br />
Push to select the display range. (p. 15)<br />
<br />
Push to select an AIS target in the target or danger list<br />
display. (pp. 16, 17)<br />
r ENTER KEY [ENT]<br />
<br />
➥ Push to display the detail screen of the selected AIS<br />
target. (pp. 15−17)<br />
➥ Push to save the input data. (pp. 8, 10, 15)<br />
➥ Push to enter the Menu item setting mode. (pp. 9, 28)<br />
➥ While in the Menu item setting mode, push to select a<br />
menu option. (pp. 11, 12, 16, 29, 32−34)<br />
➥ While searching for a GPS satellite, push [ENT] to display<br />
the GPS information screen. (p. 14, 31)<br />
t MENU KEY [MENU]<br />
<br />
➥ Push to enter the Menu mode. (pp. 9, 28)<br />
➥ While in the Menu mode, push to exit it, and return to the<br />
plotter, target list or danger list display which is selected<br />
before you entered the Menu mode.<br />
y CLEAR KEY [CLEAR]<br />
<br />
➥ Push to cancel the entered function, or return to the previous<br />
screen. (pp. 10, 13, 23)<br />
➥ While in the Menu mode, push to exit it, and return to the<br />
previous screen. (pp. 9, 28)<br />
➥ Push to stop the alarm. (pp. 15−17)<br />
u DSC KEY [DSC]<br />
<br />
➥ When the AIS target is selected, or the detail screen is<br />
displayed, push to display the voice channel selection<br />
screen. (p. 22)<br />
➥ After selecting the voice channel, push to transmit an<br />
Individual DSC call to the selected AIS target. (p. 22)<br />
This function is available only when the transceiver is<br />
connected to the transponder. (p. 37)<br />
i POWER/BRILL KEY [POWER•BRILL]<br />
<br />
➥ Hold down for 1 second to turn the power ON or OFF.<br />
(p. 14)<br />
• After turning ON the power, the opening screen will appear.<br />
➥ Push to show the display backlight and contrast adjusting<br />
screen. (p. 15)<br />
o <strong>MA</strong>N OVERBOAT KEY [MOB]<br />
<br />
Hold down for 1 second to set the waypoint. (p. 25)<br />
• The MOB alarm sounds, and a flag icon appears on your current<br />
position.<br />
2<br />
3