MA-500TR Instruction Manual - ICOM Canada
MA-500TR Instruction Manual - ICOM Canada
MA-500TR Instruction Manual - ICOM Canada

You also want an ePaper? Increase the reach of your titles
YUMPU automatically turns print PDFs into web optimized ePapers that Google loves.
3 PREPARATION<br />
■ MMSI code setting (Continued)<br />
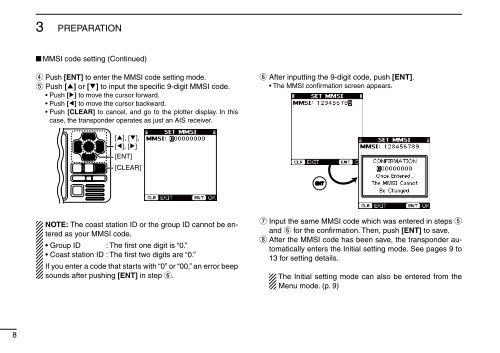
r Push [ENT] to enter the MMSI code setting mode.<br />
t Push [∫] or [√] to input the specific 9-digit MMSI code.<br />
• Push [≈] to move the cursor forward.<br />
• Push [Ω] to move the cursor backward.<br />
• Push [CLEAR] to cancel, and go to the plotter display. In this<br />
case, the transponder operates as just an AIS receiver.<br />
y After inputting the 9-digit code, push [ENT].<br />
• The MMSI confirmation screen appears.<br />
[∫], [√],<br />
[Ω], [≈]<br />
[ENT]<br />
[CLEAR]<br />
NOTE: The coast station ID or the group ID cannot be entered<br />
as your MMSI code.<br />
• Group ID : The first one digit is “0.”<br />
• Coast station ID : The first two digits are “0.”<br />
If you enter a code that starts with “0” or “00,” an error beep<br />
sounds after pushing [ENT] in step y.<br />
u Input the same MMSI code which was entered in steps t<br />
and y for the confirmation. Then, push [ENT] to save.<br />
i After the MMSI code has been save, the transponder automatically<br />
enters the Initial setting mode. See pages 9 to<br />
13 for setting details.<br />
The Initial setting mode can also be entered from the<br />
Menu mode. (p. 9)<br />
8