Create successful ePaper yourself
Turn your PDF publications into a flip-book with our unique Google optimized e-Paper software.
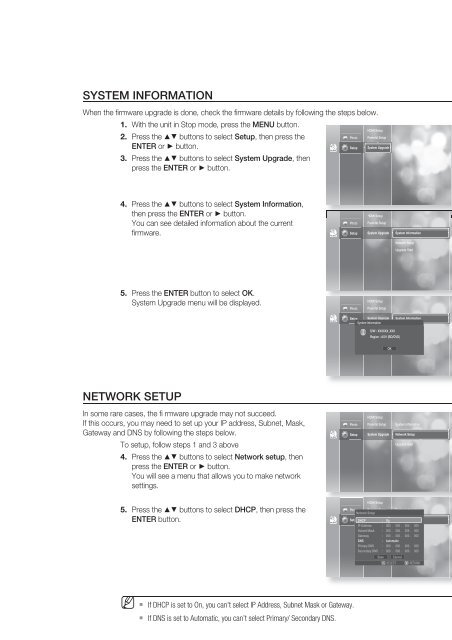
SYSTEM INFORMATION<br />
When the fi rmware upgrade is done, check the fi rmware details by following the steps below.<br />
1.<br />
2.<br />
3.<br />
With the unit in Stop mode, press the MENU button.<br />
Press the ▲▼ buttons to select Setup, then press the<br />
ENTER or ► button.<br />
Press the ▲▼ buttons to select System Upgrade, then<br />
press the ENTER or ► button.<br />
No <strong>Disc</strong><br />
Photo<br />
Setup<br />
HDMI Setup<br />
Parental Setup<br />
System Upgrade<br />
4.<br />
Press the ▲▼ buttons to select System Information,<br />
then press the ENTER or ► button.<br />
You can see detailed information about the current<br />
fi rmware.<br />
No <strong>Disc</strong><br />
Photo<br />
Setup<br />
HDMI Setup<br />
Parental Setup<br />
System Upgrade<br />
System Information<br />
Network Setup<br />
Upgrade Start<br />
● SYSTEM UPGRADE<br />
5.<br />
Press the ENTER button to select OK.<br />
System Upgrade menu will be displayed.<br />
Photo<br />
HDMI Setup<br />
Parental Setup<br />
No <strong>Disc</strong><br />
Setup System Upgrade<br />
System Information<br />
System Information<br />
Network Setup<br />
S/W : XXXXXX_XXX<br />
Region : A/01 (BD/DVD)<br />
Upgrade Start<br />
OK<br />
NETWORK SETUP<br />
In some rare cases, the fi rmware upgrade may not succeed.<br />
If this occurs, you may need to set up your IP address, Subnet, Mask,<br />
Gateway and DNS by following the steps below.<br />
To setup, follow steps 1 and 3 above<br />
4.<br />
Press the ▲▼ buttons to select Network setup, then<br />
press the ENTER or ► button.<br />
You will see a menu that allows you to make network<br />
settings.<br />
No <strong>Disc</strong><br />
Photo<br />
Setup<br />
HDMI Setup<br />
Parental Setup<br />
System Upgrade<br />
System Information<br />
Network Setup<br />
Upgrade Start<br />
5.<br />
Press the ▲▼ buttons to select DHCP, then press the<br />
ENTER button.<br />
No <strong>Disc</strong><br />
HDMI Setup<br />
Photo Parental Setup<br />
Network Setup<br />
Setup DHCP System Upgrade : On Network Setup<br />
IP Address : 000 . 000 . 000 . 000<br />
Subnet Mask : 255 . Upgrade 255 . 255 Start . 000<br />
Gateway : 000 . 000 . 000 . 000<br />
DNS : Automatic<br />
Primary DNS : 000 . 000 . 000 . 000<br />
Secondary DNS : 000 . 000 . 000 . 000<br />
Save<br />
s SELECT<br />
System Information<br />
Cancel<br />
² RETURN<br />
M <br />
<br />
If DHCP is set to On, you can't select IP Address, Subnet Mask or Gateway.<br />
If DNS is set to Automatic, you can’t select Primary/ Secondary DNS.<br />
English _47


