Galileo SOL Manual - Scubapro
Galileo SOL Manual - Scubapro
Galileo SOL Manual - Scubapro

You also want an ePaper? Increase the reach of your titles
YUMPU automatically turns print PDFs into web optimized ePapers that Google loves.
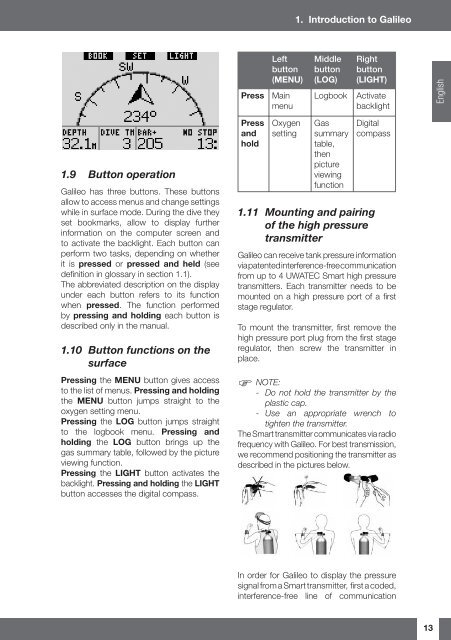
1. Introduction to <strong>Galileo</strong><br />
Press<br />
Left<br />
button<br />
(MENU)<br />
Main<br />
menu<br />
Middle<br />
button<br />
(LOG)<br />
Logbook<br />
Right<br />
button<br />
(LIGHT)<br />
Activate<br />
backlight<br />
English<br />
1.9 Button operation<br />
<strong>Galileo</strong> has three buttons. These buttons<br />
allow to access menus and change settings<br />
while in surface mode. During the dive they<br />
set bookmarks, allow to display further<br />
information on the computer screen and<br />
to activate the backlight. Each button can<br />
perform two tasks, depending on whether<br />
it is pressed or pressed and held (see<br />
defi nition in glossary in section 1.1).<br />
The abbreviated description on the display<br />
under each button refers to its function<br />
when pressed. The function performed<br />
by pressing and holding each button is<br />
described only in the manual.<br />
1.10 Button functions on the<br />
surface<br />
Pressing the MENU button gives access<br />
to the list of menus. Pressing and holding<br />
the MENU button jumps straight to the<br />
oxygen setting menu.<br />
Pressing the LOG button jumps straight<br />
to the logbook menu. Pressing and<br />
holding the LOG button brings up the<br />
gas summary table, followed by the picture<br />
viewing function.<br />
Pressing the LIGHT button activates the<br />
backlight. Pressing and holding the LIGHT<br />
button accesses the digital compass.<br />
Press<br />
and<br />
hold<br />
Oxygen<br />
setting<br />
Gas<br />
summary<br />
table,<br />
then<br />
picture<br />
viewing<br />
function<br />
Digital<br />
compass<br />
1.11 Mounting and pairing<br />
of the high pressure<br />
transmitter<br />
<strong>Galileo</strong> can receive tank pressure information<br />
via patented interference-free communication<br />
from up to 4 UWATEC Smart high pressure<br />
transmitters. Each transmitter needs to be<br />
mounted on a high pressure port of a fi rst<br />
stage regulator.<br />
To mount the transmitter, fi rst remove the<br />
high pressure port plug from the fi rst stage<br />
regulator, then screw the transmitter in<br />
place.<br />
NOTE:<br />
- Do not hold the transmitter by the<br />
plastic cap.<br />
- Use an appropriate wrench to<br />
tighten the transmitter.<br />
The Smart transmitter communicates via radio<br />
frequency with <strong>Galileo</strong>. For best transmission,<br />
we recommend positioning the transmitter as<br />
described in the pictures below.<br />
In order for <strong>Galileo</strong> to display the pressure<br />
signal from a Smart transmitter, fi rst a coded,<br />
interference-free line of communication<br />
13