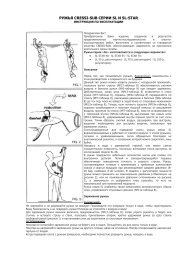
Galileo SOL Manual - Scubapro
Galileo SOL Manual - Scubapro
Galileo SOL Manual - Scubapro

You also want an ePaper? Increase the reach of your titles
YUMPU automatically turns print PDFs into web optimized ePapers that Google loves.
4. <strong>Galileo</strong> and SmartTRAK (PC interface)<br />
You can choose between transferring all dives or new dives only (default setting) from<br />
<strong>Galileo</strong>’s memory. If you choose to transfer new dives only, SmartTRAK will only transfer<br />
dives that are more recent than the most recent dive already saved in the PC logbook.<br />
Once the data is downloaded, a window will show you a summary table of all dives; for the<br />
selected dive, another window will show you its details. From these windows you can add<br />
and edit your dive information.<br />
4.4 Uploading pictures<br />
<strong>Galileo</strong>’s memory allows you to store up to 100 grey-scale bitmap pictures which can be<br />
viewed on the surface or underwater as described in Chapters 2 and 3.<br />
To handle pictures, you need to choose GALILEO SETUP under OPTIONS. This will<br />
bring up the <strong>Galileo</strong> Setup window, which has various tabs along the right edge. Click on the<br />
PICTURES tab and you will see a window similar to the one depicted below.<br />
Pictures already stored in <strong>Galileo</strong>’s memory will be shown to the very right end of your<br />
screen. Their sequence corresponds to the actual viewing sequence on <strong>Galileo</strong>’s screen.<br />
The sequence can only be changed by deleting and reloading the pictures. To delete a<br />
picture, select it by clicking it and press the DELETE button under the preview.<br />
To upload pictures to <strong>Galileo</strong>, use the dialog box to the left to browse your hard drive and locate<br />
the pictures of interest. After selecting a picture, SmartTRAK shows a grey scale preview of<br />
the same picture, as it will appear on <strong>Galileo</strong>. You can adjust the grey levels using the sliding<br />
bars above the preview, then click on the arrow on top to transfer the picture to <strong>Galileo</strong>.<br />
If you wish to download pictures from <strong>Galileo</strong> to the PC, select a picture and click on the<br />
arrow underneath the preview window.<br />
72