

NetApp and VMware vSphere Storage Best Practices
NetApp and VMware vSphere Storage Best Practices
NetApp and VMware vSphere Storage Best Practices

Create successful ePaper yourself
Turn your PDF publications into a flip-book with our unique Google optimized e-Paper software.
It is common for customers who run <strong>VMware</strong> on NFS to want to access their datastores from Windows<br />
systems in order to complete administrative functions. With this use case in mind set the volume security<br />
style to UNIX <strong>and</strong> make sure that the FAS user mapping is setup correctly in order to enable windows user<br />
access to this data. For more information on this subject review the section File Sharing Between NFS <strong>and</strong><br />
CIFS in the Data ONTAP File Access <strong>and</strong> Protocol Management Guide.<br />
If you need to change the file system security type follow these steps.<br />
1 Log in to the <strong>NetApp</strong> console.<br />
2<br />
3<br />
From the storage appliance console, run<br />
vol options no_atime_update on<br />
From the storage appliance console, run<br />
qtree security UNIX<br />
4 Repeat steps 2 <strong>and</strong> 3 for each NFS accessed volume.<br />
6.3 ESX NFS TIMEOUT SETTINGS<br />
When connecting to NFS datastores <strong>NetApp</strong> recommends adjusting a few NFS options around connection<br />
monitoring <strong>and</strong> resiliency. These settings can be automatically set for you should you decide to install the 7<br />
The <strong>NetApp</strong> ESX Host Utilities. The EHU is only supported with ESX, so if you are running ESXi or<br />
should you opt to not install the EHU the steps for updating these setting are listed below.<br />
ESX 4.0 HOST<br />
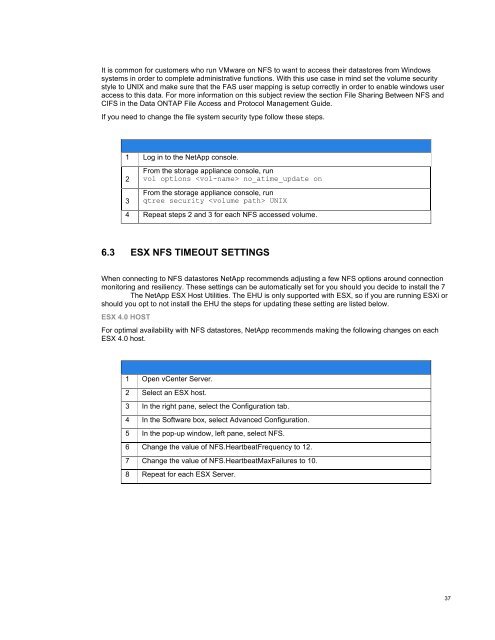
For optimal availability with NFS datastores, <strong>NetApp</strong> recommends making the following changes on each<br />
ESX 4.0 host.<br />
1 Open vCenter Server.<br />
2 Select an ESX host.<br />
3 In the right pane, select the Configuration tab.<br />
4 In the Software box, select Advanced Configuration.<br />
5 In the pop-up window, left pane, select NFS.<br />
6 Change the value of NFS.HeartbeatFrequency to 12.<br />
7 Change the value of NFS.HeartbeatMaxFailures to 10.<br />
8 Repeat for each ESX Server.<br />
37