

NetApp and VMware vSphere Storage Best Practices
NetApp and VMware vSphere Storage Best Practices
NetApp and VMware vSphere Storage Best Practices

Create successful ePaper yourself
Turn your PDF publications into a flip-book with our unique Google optimized e-Paper software.
lw==<br />
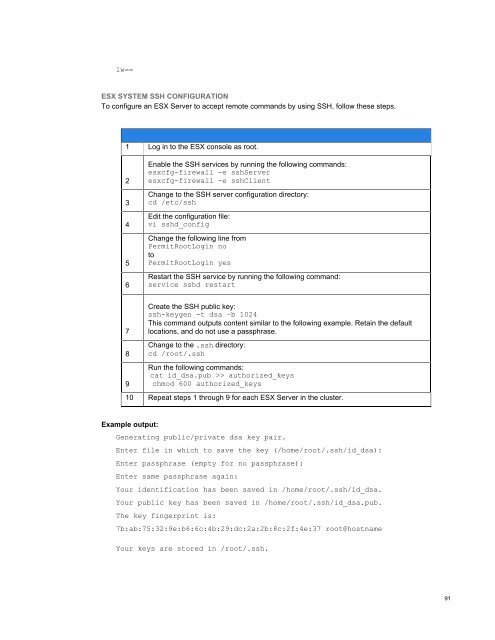
ESX SYSTEM SSH CONFIGURATION<br />
To configure an ESX Server to accept remote comm<strong>and</strong>s by using SSH, follow these steps.<br />
1 Log in to the ESX console as root.<br />
2<br />
3<br />
4<br />
5<br />
6<br />
Enable the SSH services by running the following comm<strong>and</strong>s:<br />
esxcfg-firewall -e sshServer<br />
esxcfg-firewall -e sshClient<br />
Change to the SSH server configuration directory:<br />
cd /etc/ssh<br />
Edit the configuration file:<br />
vi sshd_config<br />
Change the following line from<br />
PermitRootLogin no<br />
to<br />
PermitRootLogin yes<br />
Restart the SSH service by running the following comm<strong>and</strong>:<br />
service sshd restart<br />
7<br />
8<br />
9<br />
Create the SSH public key:<br />
ssh-keygen -t dsa –b 1024<br />
This comm<strong>and</strong> outputs content similar to the following example. Retain the default<br />
locations, <strong>and</strong> do not use a passphrase.<br />
Change to the .ssh directory:<br />
cd /root/.ssh<br />
Run the following comm<strong>and</strong>s:<br />
cat id_dsa.pub >> authorized_keys<br />
chmod 600 authorized_keys<br />
10 Repeat steps 1 through 9 for each ESX Server in the cluster.<br />
Example output:<br />
Generating public/private dsa key pair.<br />
Enter file in which to save the key (/home/root/.ssh/id_dsa):<br />
Enter passphrase (empty for no passphrase):<br />
Enter same passphrase again:<br />
Your identification has been saved in /home/root/.ssh/id_dsa.<br />
Your public key has been saved in /home/root/.ssh/id_dsa.pub.<br />
The key fingerprint is:<br />
7b:ab:75:32:9e:b6:6c:4b:29:dc:2a:2b:8c:2f:4e:37 root@hostname<br />
Your keys are stored in /root/.ssh.<br />
91