

NetApp and VMware vSphere Storage Best Practices
NetApp and VMware vSphere Storage Best Practices
NetApp and VMware vSphere Storage Best Practices

Create successful ePaper yourself
Turn your PDF publications into a flip-book with our unique Google optimized e-Paper software.
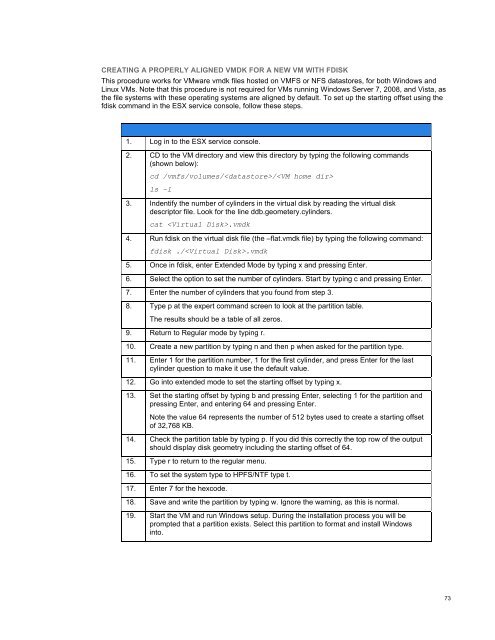
CREATING A PROPERLY ALIGNED VMDK FOR A NEW VM WITH FDISK<br />
This procedure works for <strong>VMware</strong> vmdk files hosted on VMFS or NFS datastores, for both Windows <strong>and</strong><br />
Linux VMs. Note that this procedure is not required for VMs running Windows Server 7, 2008, <strong>and</strong> Vista, as<br />
the file systems with these operating systems are aligned by default. To set up the starting offset using the<br />
fdisk comm<strong>and</strong> in the ESX service console, follow these steps.<br />
1. Log in to the ESX service console.<br />
2. CD to the VM directory <strong>and</strong> view this directory by typing the following comm<strong>and</strong>s<br />
(shown below):<br />
cd /vmfs/volumes//<br />
ls –l<br />
3. Indentify the number of cylinders in the virtual disk by reading the virtual disk<br />
descriptor file. Look for the line ddb.geometery.cylinders.<br />
cat .vmdk<br />
4. Run fdisk on the virtual disk file (the –flat.vmdk file) by typing the following comm<strong>and</strong>:<br />
fdisk ./.vmdk<br />
5. Once in fdisk, enter Extended Mode by typing x <strong>and</strong> pressing Enter.<br />
6. Select the option to set the number of cylinders. Start by typing c <strong>and</strong> pressing Enter.<br />
7. Enter the number of cylinders that you found from step 3.<br />
8. Type p at the expert comm<strong>and</strong> screen to look at the partition table.<br />
The results should be a table of all zeros.<br />
9. Return to Regular mode by typing r.<br />
10. Create a new partition by typing n <strong>and</strong> then p when asked for the partition type.<br />
11. Enter 1 for the partition number, 1 for the first cylinder, <strong>and</strong> press Enter for the last<br />
cylinder question to make it use the default value.<br />
12. Go into extended mode to set the starting offset by typing x.<br />
13. Set the starting offset by typing b <strong>and</strong> pressing Enter, selecting 1 for the partition <strong>and</strong><br />
pressing Enter, <strong>and</strong> entering 64 <strong>and</strong> pressing Enter.<br />
Note the value 64 represents the number of 512 bytes used to create a starting offset<br />
of 32,768 KB.<br />
14. Check the partition table by typing p. If you did this correctly the top row of the output<br />
should display disk geometry including the starting offset of 64.<br />
15. Type r to return to the regular menu.<br />
16. To set the system type to HPFS/NTF type t.<br />
17. Enter 7 for the hexcode.<br />
18. Save <strong>and</strong> write the partition by typing w. Ignore the warning, as this is normal.<br />
19. Start the VM <strong>and</strong> run Windows setup. During the installation process you will be<br />
prompted that a partition exists. Select this partition to format <strong>and</strong> install Windows<br />
into.<br />
73