GPTLR SERIES (2008 Release) - Maxon
GPTLR SERIES (2008 Release) - Maxon
GPTLR SERIES (2008 Release) - Maxon

You also want an ePaper? Increase the reach of your titles
YUMPU automatically turns print PDFs into web optimized ePapers that Google loves.
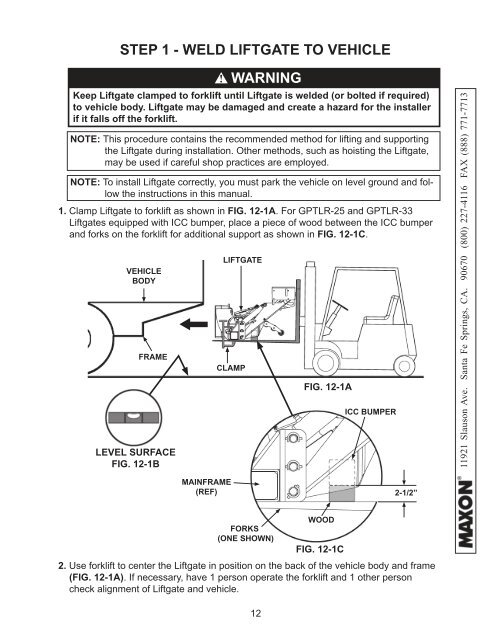
STEP 1 - WELD LIFTGATE TO VEHICLE<br />
1. Clamp Liftgate to forklift as shown in FIG. 12-1A. For <strong>GPTLR</strong>-25 and <strong>GPTLR</strong>-33<br />
Liftgates equipped with ICC bumper, place a piece of wood between the ICC bumper<br />
and forks on the forklift for additional support as shown in FIG. 12-1C.<br />
VEHICLE<br />
BODY<br />
LIFTGATE<br />
CLAMP<br />
WARNING<br />
Keep Liftgate clamped to forklift until Liftgate is welded (or bolted if required)<br />
to vehicle body. Liftgate may be damaged and create a hazard for the installer<br />
if it falls off the forklift.<br />
NOTE: To install Liftgate correctly, you must park the vehicle on level ground and follow<br />
the instructions in this manual.<br />
FRAME<br />
LEVEL SURFACE<br />
FIG. 12-1B<br />
!<br />
NOTE: This procedure contains the recommended method for lifting and supporting<br />
the Liftgate during installation. Other methods, such as hoisting the Liftgate,<br />
may be used if careful shop practices are employed.<br />
FIG. 12-1A<br />
ICC BUMPER<br />
11921 Slauson Ave. Santa Fe Springs, CA. 90670 (800) 227-4116 FAX (888) 771-7713<br />
MAINFRAME<br />
(REF)<br />
2-1/2”<br />
FORKS<br />
(ONE SHOWN)<br />
12<br />
WOOD<br />
FIG. 12-1C<br />
2. Use forklift to center the Liftgate in position on the back of the vehicle body and frame<br />
(FIG. 12-1A). If necessary, have 1 person operate the forklift and 1 other person<br />
check alignment of Liftgate and vehicle.